

Recorders & Duplicators: Formats, Uses and Buying Factors
The right choice depends on the job: recorders capture footage, while duplicators make copies for distribution. Choosing between recorders & duplicators means matching the format and workflow to your need, whether that’s Blu-ray, CD or DVD duplication, portable or professional recording, or long-term video archiving.
It’s easy to focus on the device name, but the recording format, media and destination for your footage matter just as much. This guide explains how the main options differ and which buying factors shape a practical setup. You’ll learn what duplication equipment does, how portable and professional recorders fit into production, and how to plan storage for archived video, including the demands of raw 4K footage.
Key Takeaways
- Match Blu-ray, CD or DVD duplication to the format and playback needs of the material you’re distributing.
- Choose a portable recording setup around camera compatibility and where footage will be recorded, such as an attached recorder or storage mounted to a camera cage.
- Assess professional recording monitors by their recording workflow and supported media, including models that use UHS-II SD card slots.
- Plan video archives around the footage format and storage demands so material remains accessible without occupying valuable working-drive space.
- Use the recording requirements of your production to guide camera and equipment decisions, including professional video and digital cinema cameras.
Blu-ray duplication
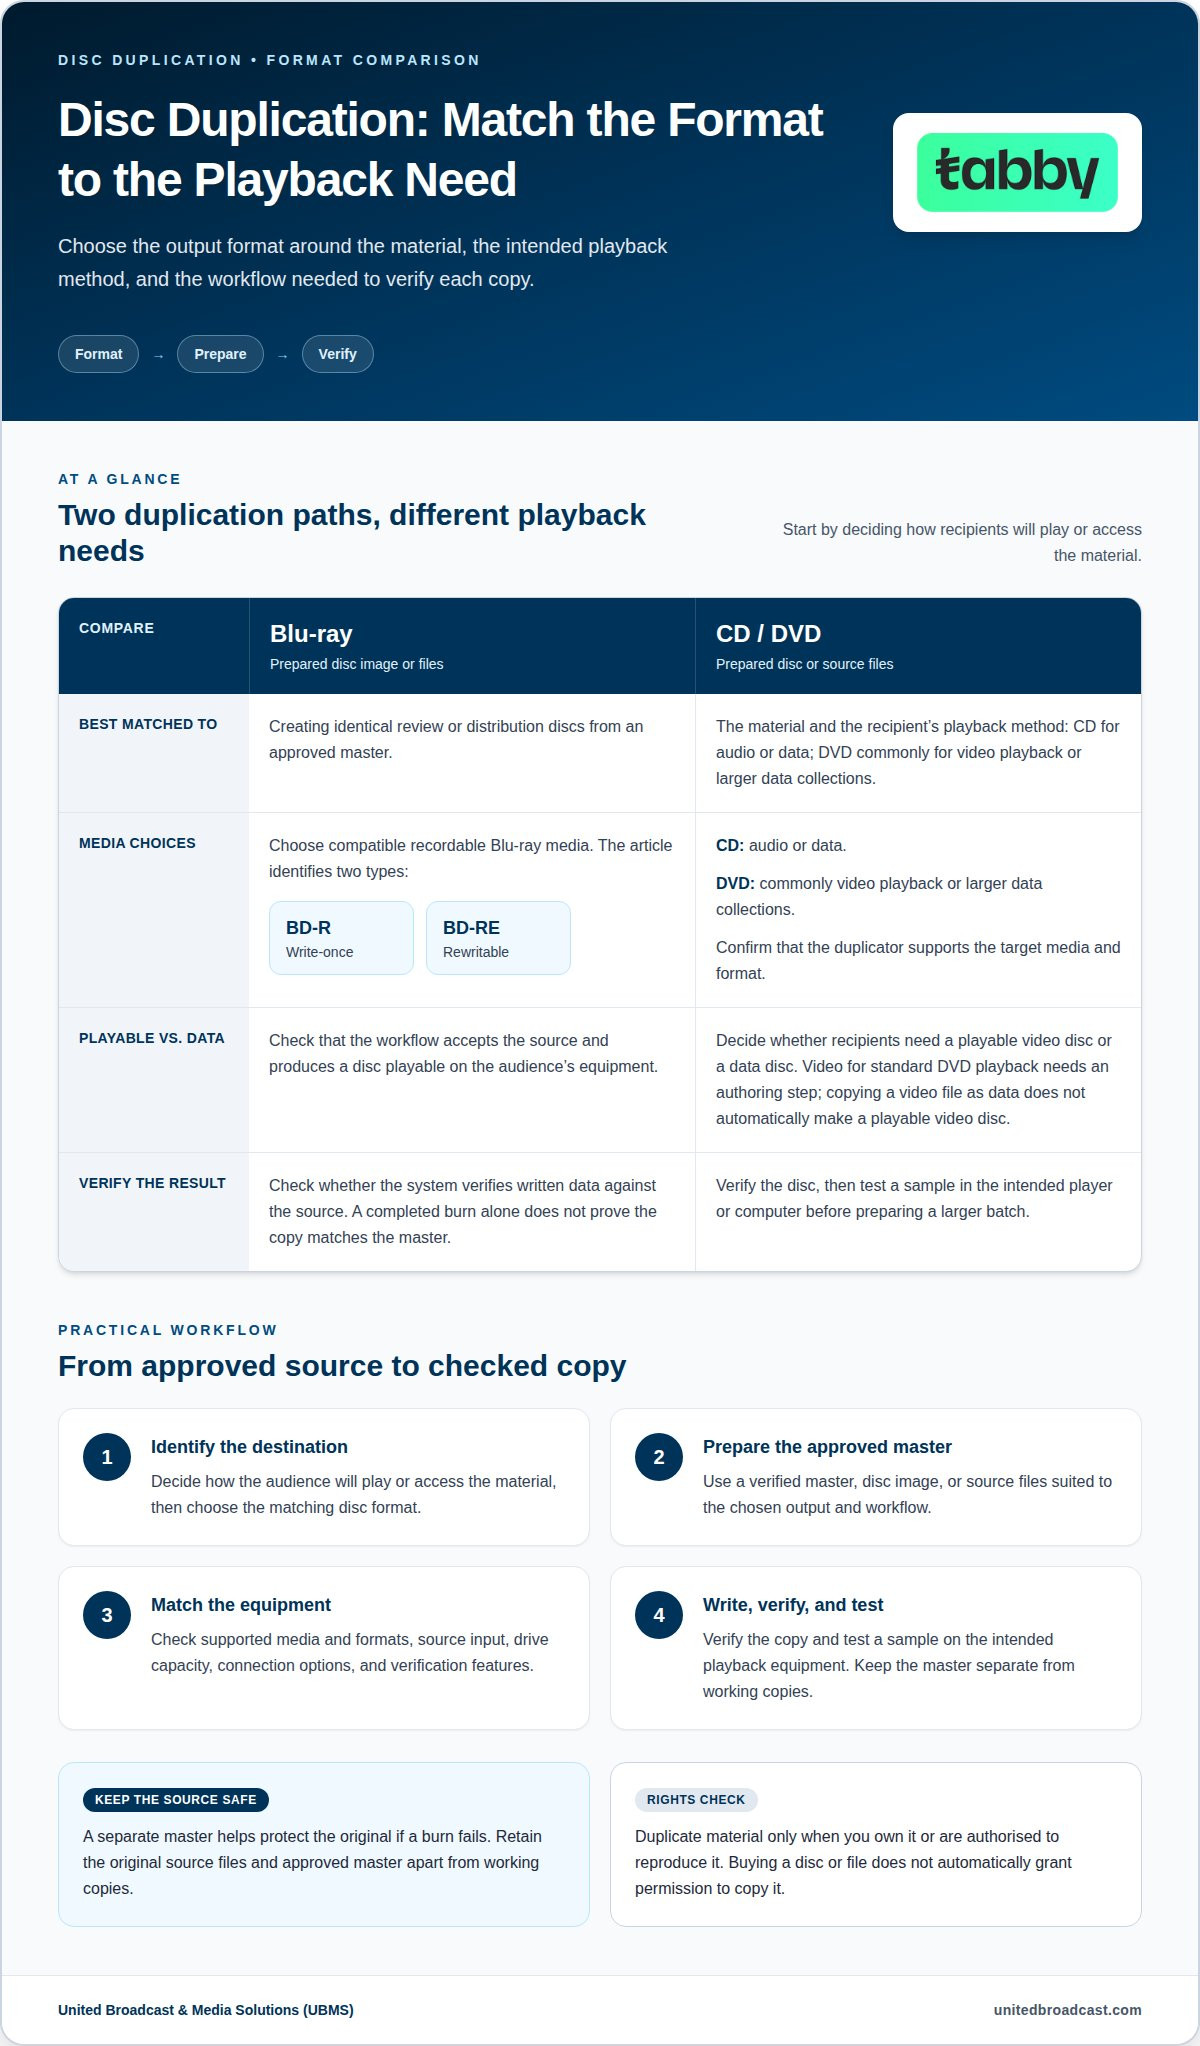
Blu-ray duplication copies a prepared disc image to recordable Blu-ray media for distribution or backup. Start with a verified master, choose compatible blank discs, and use a duplicator suited to the required output. For example, a production team can create identical review discs from an approved master. Keep the master separate from the copies so a failed burn doesn’t leave you without the original.
When comparing recorders & duplicators, focus on supported media formats, simultaneous copy capacity, connection options, and verification features. Match each device to the source files and playback equipment. A single-drive unit may suit occasional copying, while a multi-drive setup can handle repeated batches. Check whether the system verifies written data: a completed burn alone doesn’t prove that a copy matches the master.
Audio recorders capture sound from a microphone or another input; duplicators reproduce existing recordings on target media. A disc duplicator reads a source disc or image, writes the data, and may compare the result with the source. For Blu-ray work, the distinction is straightforward: recording creates content, while duplication reproduces a prepared deliverable.
Supported media and file formats vary by device and software. Blu-ray media includes write-once BD-R and rewritable BD-RE discs, while source material may be supplied as files or a disc image. Confirm that the workflow accepts your source and produces a disc playable on the audience’s equipment. CD/DVD duplicators can also copy video files into Blu-ray or standard DVD formats.
When sound is recorded separately from picture, a time code stamp generator can help synchronise the tracks during editing. It places matching timecode information on recordings, giving the editor a reference for aligning audio and video. Before a shoot, confirm that the camera, recorder, and editing workflow use compatible timecode settings. This is particularly useful when separate sound equipment captures dialogue or location audio.
Copyright is a rights-clearance matter: duplicate material you own or are authorised to reproduce, and obtain permission for third-party audio, video, or data. Buying a disc doesn’t automatically grant permission to copy it. For a UAE project, identify the rights holder and permitted use before preparing a distribution batch, especially when the content includes music, footage, or licensed material.
There is no single price for every Blu-ray duplicator. Cost depends on factors such as drive count, supported media, verification functions, and whether the workflow requires separate authoring equipment. Compare these capabilities with your batch size and operating needs rather than choosing by drive count alone. Disc media and any required authoring software also affect the overall setup.
If a copy fails, check the source image, disc condition, and drive compatibility before trying again. Use clean, undamaged media and don’t interrupt a write in progress. Verify sample copies on the intended playback equipment, then confirm that the disc contains the expected files. Keep a separate master and backup: failed media, incorrect settings, or a damaged source can otherwise lead to quality or data-loss problems.
CD and DVD duplication
CD and DVD duplication copies a prepared disc or source files onto blank media. The right format depends on the material and how recipients will play or access it. For example, a presentation with video may be prepared for standard DVD playback, while files intended for a computer can be organised as data. First identify the destination, then prepare a master to suit it.
To make copies, load the prepared master or source files into a compatible recorder, select the target disc format, and start the process. Once writing is complete, verify the disc and test a sample in the intended player or computer. This helps catch an incompatible format or incomplete copy before preparing a larger batch.
CDs and DVDs serve different purposes. A CD can hold audio or data, while a DVD is commonly used for video playback or larger data collections. Your choice affects the authoring workflow, not just the blank disc. A video file must be prepared in a format suited to its intended playback method; copying it as data doesn’t automatically create a playable video disc.
Some CD/DVD duplicators can copy video files into Blu-ray or standard DVD formats. The source and output settings matter: decide whether you need a playable disc or a data copy, then choose the matching format. For example, video prepared for standard DVD playback needs an authoring step, while a data disc keeps files available to compatible devices.
For repeated copying, compare the duplicator’s supported media, number of writing drives, source input, and verification process. A single-drive workflow may suit occasional distribution; multiple drives can prepare copies in parallel. Decide how the operator will identify the approved master and organise finished discs. Clear labels or a batch record help prevent an outdated version from being distributed by mistake.
If a disc fails, check the source, target format, and media condition before retrying. Test a copy on the playback device used by the audience, such as a home DVD player or office computer. A disc that opens on one device may behave differently on another. Keep the original source files and approved master separate from working copies to reduce the risk of data loss.
Copyright permission matters for CD and DVD content. Copy material only when you hold the rights or have authorisation, including for music, video, and data. For UAE distribution, establish the permitted use before preparing a batch. Owning a disc or file doesn’t automatically give you permission to reproduce it.
Choose a setup by matching its media support and workflow to your source and intended playback. Explore recorder and duplicator options as you narrow down the required format and copying process.
Portable digital video recorders
A portable recorder adds an external recording option to a camera setup. Some professional cinema cameras accept dedicated RAW recorders attached directly to the body. This can make the recorder part of a compact rig rather than a separate, desk-based workflow. Before choosing a recorder, identify the camera model and the format required for the project.
Storage is another key decision. Portable video recorders can record directly to SSDs or high-capacity flash memory fitted to a camera cage. An SSD may suit a rig designed around external drives, while cage-mounted flash storage keeps media close to the camera. The best arrangement depends on the camera rig, recording workflow, and how operators manage media after each take.
Check compatibility before planning a recording setup. Start with the camera’s supported connections and recording options, then match them to the external recorder. For RAW capture, check whether the camera supports an external recorder and whether the recorder is compatible. The camera, recorder, cable, storage device, and mounting position must work together as a complete rig.
Physical layout matters on location. A recorder attached directly to a camera adds equipment around the body, while an SSD or flash memory fitted to a cage needs secure placement. Consider access to camera controls, cable routing, and whether the operator can change media without dismantling the rig. A configuration that works on a tripod may feel different during handheld shooting.
Plan the recording workflow before a shoot. Confirm the camera and recorder settings, prepare the intended storage, and make a short test recording. Play it back before capturing important footage. This can reveal a connection issue or a mismatch between the recording mode and storage workflow while the setup is still easy to adjust.
Media handling also affects the purchase decision. Decide how operators will identify recorded and unused drives, transfer footage, and protect original camera media during production. For example, separate, clearly marked cases can keep used SSDs apart from blank ones. Consistent naming and handoff practices help teams trace each recording to its camera and shoot segment.
For RAW workflows, consider the complete path from capture to post-production. Confirm that the recorder creates the required files and that the editing workflow can ingest them. Storage capacity, transfer routines, and backup planning all affect how smoothly footage moves beyond the camera. A recorder is useful only if its output fits the production’s media process.
Compare portable options by camera compatibility, supported recording formats, storage type, mounting method, and suitability for the shoot. A compact cage-mounted camera may call for different priorities from a rig built around an attached RAW recorder. Matching these details to the production helps you avoid choosing equipment based on a single feature.
Professional video recorders
Professional video recording setups can combine a camera with an external recorder or recording monitor. The recorder’s role depends on the workflow: it may capture video while providing a screen for framing and review. Start with the camera’s outputs, required recording format, and how footage will move into editing when choosing equipment.
Some professional video recording monitors have one or more slots for high-capacity UHS-II SD cards. Slot configuration affects how a crew manages media during a shoot. A single-slot workflow needs a clear plan for changing cards between recording periods. A model with multiple slots may support a different media routine, depending on its design and supported recording modes.
Check compatibility first. Match the recorder’s input to the camera’s available output, then confirm that the intended recording mode works across the complete setup. A camera and monitor-recorder may connect correctly but still require suitable settings for the chosen workflow. Check how the recorder handles incoming video, which media it supports, and how files transfer to the editing system.
Screen and control requirements also shape a professional setup. A camera operator may need a larger display for focus and framing, while a studio workflow may prioritise positioning the recorder near other equipment. Consider screen visibility, mounting points, cable routing, and access to recording controls. These details affect how easily an operator can monitor a shot without interrupting camera operation.
Plan media changes before production begins. Format the selected card using the device’s recommended process, make a short test recording, and confirm playback. Then label cards to keep recorded media separate from unused media. For a multi-camera shoot, consistent labels can show which camera or recording period each card represents, supporting clearer handoffs to editing staff.
Recording quality depends on the full signal path, not the monitor alone. The camera output, recorder settings, storage media, and post-production workflow all need to align. If a test file doesn’t appear as expected, review the connection, input selection, recording settings, and card status in sequence. Testing before a scheduled shoot helps identify workflow mismatches while the equipment is accessible.
Professional video cameras are the capture point in this setup, while a compatible recorder can extend the recording workflow. For example, a production team might use an external monitor-recorder when the camera output and preferred media process support it. Evaluate the complete configuration rather than choosing a recorder based only on screen size or card slots.
Compare professional recorders by camera connectivity, recording modes, display needs, card-slot configuration, and file handoff. A studio production and a mobile crew may prioritise different factors. A short workflow test with the intended camera and media can show whether the recorder suits the production’s operating requirements.
Video archiving
Video archiving preserves completed footage for later access, reuse, or reference. Raw 4K footage can require around 2 GB of storage per minute, depending on the format. A short shoot can therefore occupy substantial working-drive space. Estimate storage from the recording format and duration, then plan where active projects and retained footage will live.
Archive drives can store film clips and video material in an accessible format, separate from the hard-drive space used for current editing. Keep archive storage distinct from working drives. For example, after delivery, a production team can move completed project media to an archive drive while keeping active files on working storage.
Build an archive workflow around clear identification. Give each project a consistent folder name and include useful details such as the production title, shoot date, camera, and version. Store related media together, including final edits and source footage. A structured catalogue helps an editor find a specific scene without opening every folder.
Before moving footage, confirm that the intended files open from the archive location. Copy the media, compare file counts and folder structure, then test representative clips in a playback or editing application. Keep the original files intact until you’ve checked the archived copies. This reduces the risk of deleting the only usable version after an incomplete transfer.
- Estimate capacity: Use the recording format and total footage duration to plan storage.
- Organise projects: Apply consistent folder names and retain useful production details.
- Test access: Open representative files from the archive before clearing working storage.
- Preserve originals: Keep source media until the copied files have been checked.
Design the archive around access needs. A project likely to return to editing should be easy to identify and retrieve. Footage kept mainly for reference can use a different folder structure from current production media. For example, separate folders for final masters, camera originals, and project documents make retrieval more direct.
Storage planning also relates to camera selection. For a production using a professional video camera, account for its recording format and the resulting file volume before setting archive capacity. The format affects how much footage a given storage space can hold, so one capacity assumption won’t suit every project. Revisit the plan when the recording workflow changes.
United Broadcast & Media Solutions (UBMS)
United Broadcast & Media Solutions (UBMS) helps production teams align camera choices with their recording workflow. If you’re assessing recorders and storage alongside camera equipment, consider how the camera’s output, intended format, and post-production process fit together. UBMS supplies professional video cameras, digital cinema cameras, cinema lenses, and professional lighting equipment for production setups.
Turn to UBMS when you’re planning a camera setup and need equipment choices to support how footage will be captured. The right configuration depends on production requirements, not a recorder feature in isolation. Contact United Broadcast & Media Solutions to discuss your professional camera and production equipment needs.
Put your production workflow into practice
Your next step is to define what the recording setup needs to do across capture, delivery, and future access. The right choice of recorders & duplicators depends on how your team handles media, not just on the device itself. Consider the camera system, production environment, and how footage will move into editing or storage.
United Broadcast & Media Solutions (UBMS) supplies professional video cameras, digital cinema cameras, and cinema lenses to support production equipment decisions. These options can help shape a camera setup around the intended workflow. If you’re refining a broader production system, connect each equipment choice to how your team captures and handles media.
Keep your workflow in view as you make the next decision, and build a setup that supports the work from capture through delivery.
Frequently Asked Questions
What types of recorders and duplicators are available for audio, video, and data?
Available types include audio recorders, camera-mounted or monitor-based video recorders, and disc or file duplicators. For example, a location sound operator may need a recorder for microphone inputs, while an office distributing presentations may need a disc duplicator. Data copying can also use a computer-based workflow. Choose according to the source, destination, playback requirements, and whether you’re capturing new material or making copies.
What are the best recorders and duplicators for home, business, and professional use?
The best fit depends on workload and existing equipment. For home projects, a straightforward device that matches the source and playback format may be sufficient. A business preparing repeated distributions should prioritise consistent copying and a clear process for identifying approved masters. Professional crews should assess camera compatibility, recording formats, media handling, and post-production workflow together, then test the setup with their actual equipment before relying on it.
How much do recorders and duplicators cost?
There is no single cost. Price depends on factors such as drive count, supported media, verification functions, and whether separate authoring equipment is needed.


