

ND Filters for Video: Choosing the Right Strength and Style
The strongest ND filter isn’t automatically the best choice. Select a density that reduces light enough to maintain your intended exposure without changing your aperture or shutter settings. When choosing the right ND filter for video, start with the scene’s brightness and the look you want, then choose a strength that preserves your planned camera settings. The filter style, fixed or variable, should also suit how often lighting conditions change during a shot.
It’s easy to focus only on filter strength. But a filter that works well for a locked-off outdoor scene may be less practical when you move between shade and direct sun or adjust framing during a take. The aim is to control incoming light while preserving consistent motion rendering, depth of field and colour across the footage.
This guide explains how ND filters affect exposure, how to choose between fixed and variable options, and how to adjust them for different video tasks. You’ll also learn what to watch for when a filter is too weak or too strong, helping you make a considered choice for your camera setup and shooting conditions.
Key Takeaways
- Match ND strength to the available light and your intended camera settings to control exposure while preserving the shot’s look.
- Use filters to shape consistency or mood in footage, then make restrained adjustments to brightness, contrast and colour.
- Adjust filter intensity in response to changing light, watching for exposure shifts and unwanted colour or image effects.
- Choose between filter styles based on the task, camera setup and whether lighting conditions are steady or changing.
- Consider how your camera, lenses and lighting equipment work together when planning a filter setup for a production.
Brightness, contrast, and exposure
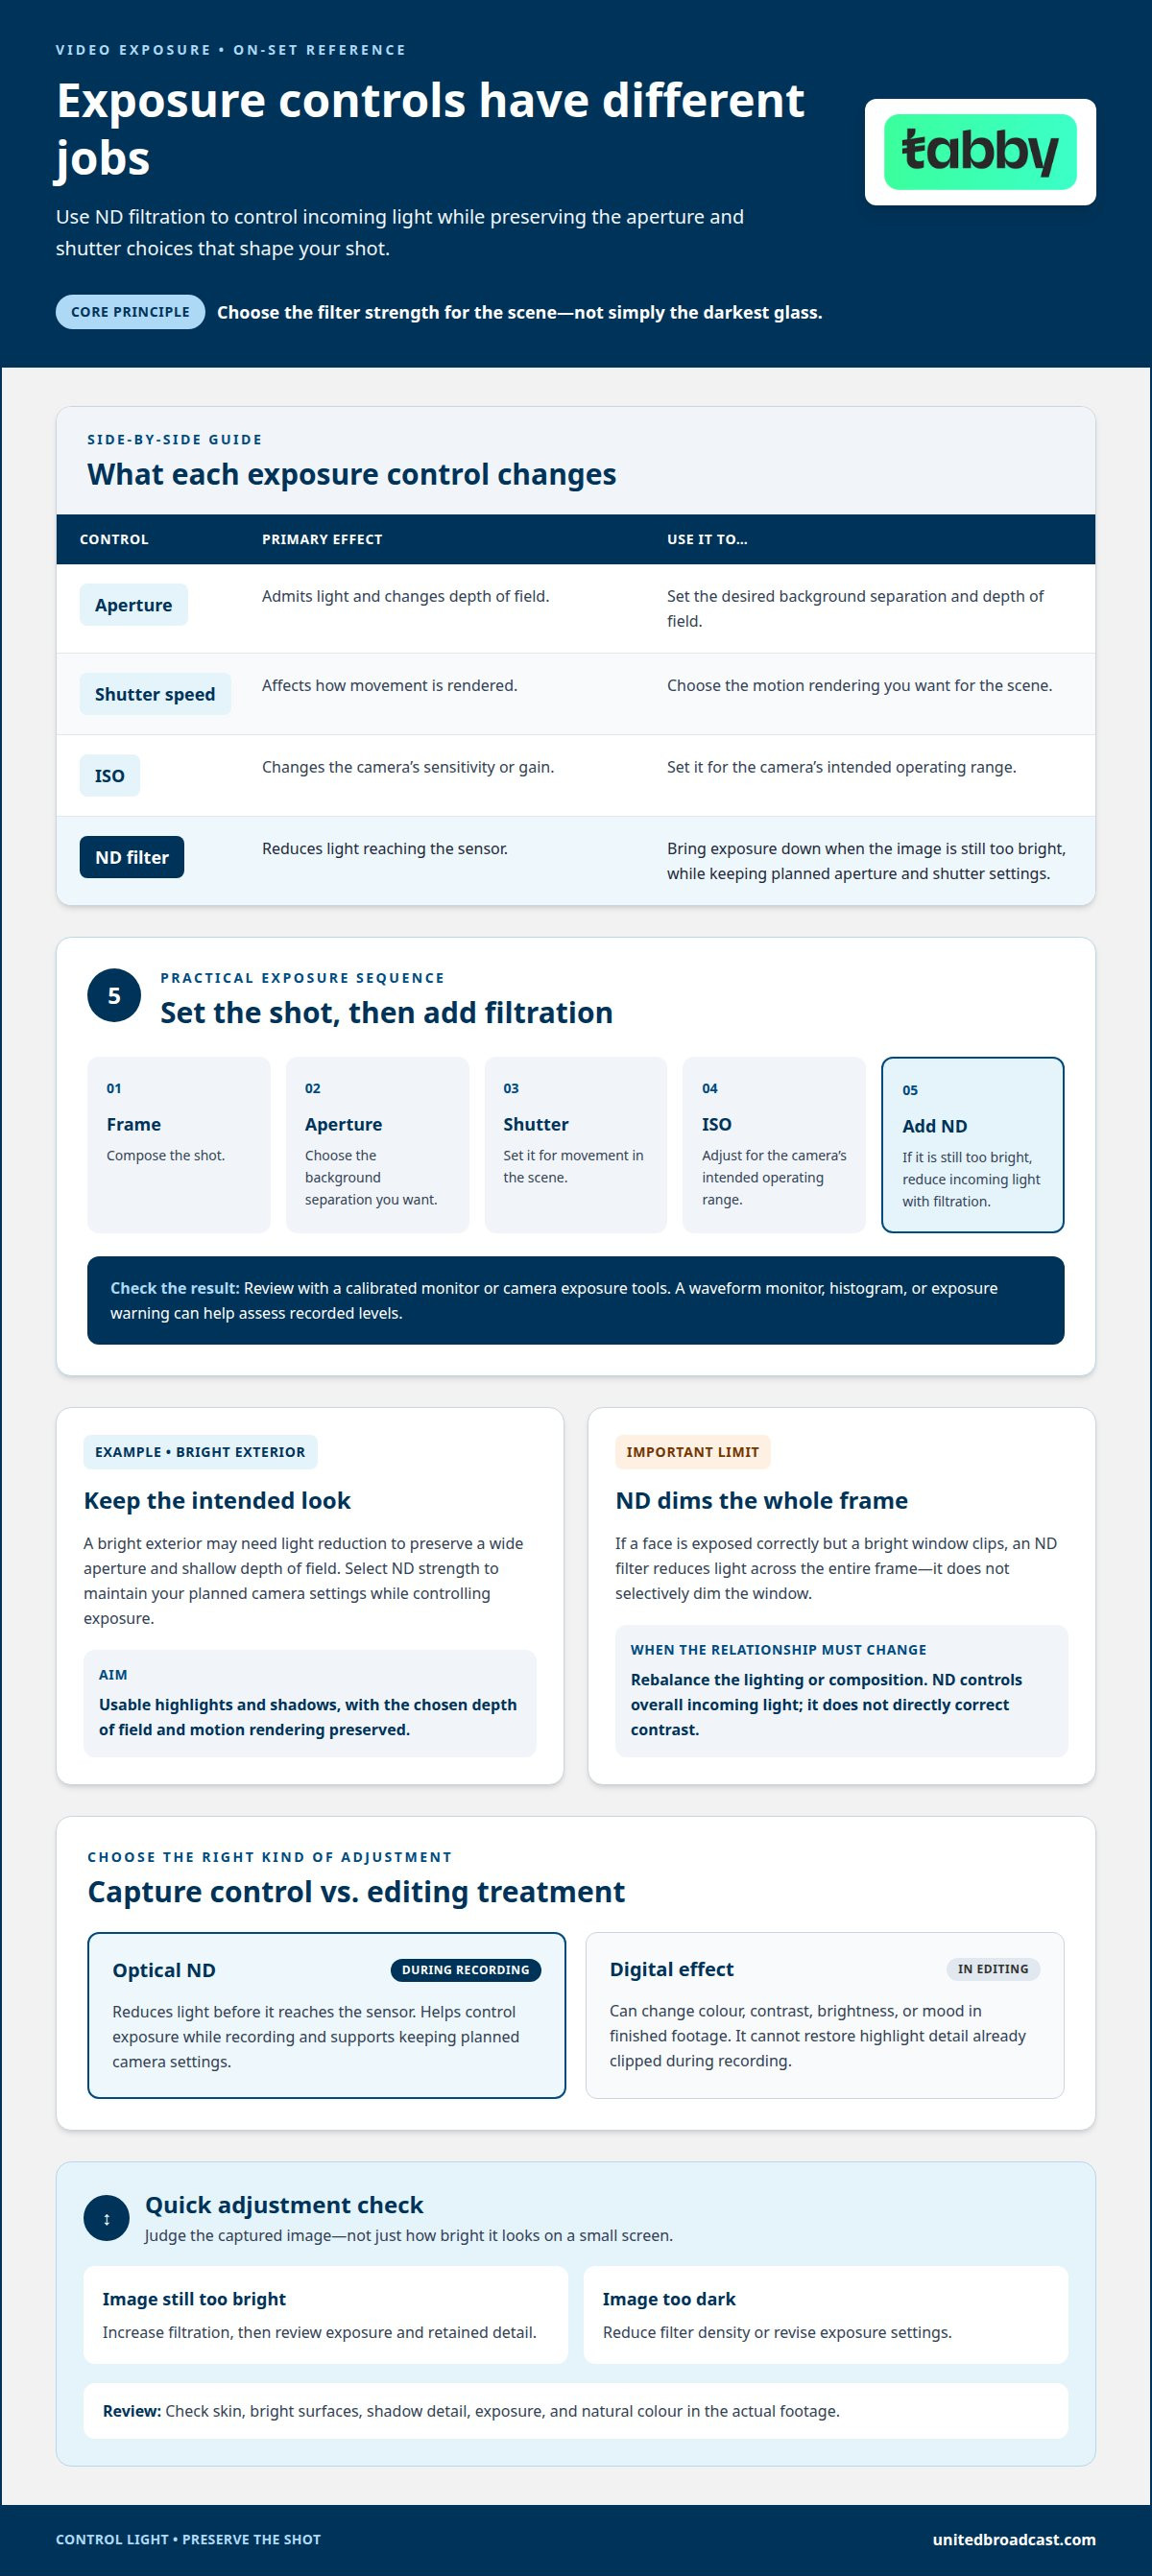
Choosing the right ND filter for video starts with the exposure you need, not simply the darkest glass available. An ND filter reduces the light reaching the camera sensor, helping you control exposure while keeping your planned aperture and shutter settings. For example, a bright exterior may require light reduction to preserve a wide aperture and shallow depth of field.
Exposure describes how much light the sensor records, while brightness describes how light or dark the image appears. Contrast is different: it describes the separation between lighter and darker areas. An ND filter primarily controls incoming light. It doesn’t directly create the strong contrast of a hard-lit face against a dark background or the soft contrast of an evenly lit interview.
Think of exposure as a balance among aperture, shutter speed and ISO. Opening the aperture admits more light and changes depth of field. Shutter speed affects motion rendering, while ISO changes the camera’s sensitivity or gain. To keep those choices consistent, place an ND filter in front of the lens to reduce the light reaching the sensor.
Use a practical exposure sequence on set. Frame the shot, choose the aperture for the desired background separation, and set the shutter speed for the movement in the scene. Then adjust ISO for the camera’s intended operating range and add ND filtration if the image is still too bright. Check the result on a calibrated monitor or with the camera’s exposure tools.
For a face beside a bright window, assess both the subject and the window. If the face is exposed correctly but the window clips, an ND filter dims the whole frame, not just the window. Rebalance the lighting or composition when you need to change the relationship between those areas. A filter controls overall light; it doesn’t selectively correct contrast.
Use a waveform monitor, histogram or exposure warning to assess recorded levels. These tools can reveal highlights that look acceptable on a small device screen. A black-and-white monitoring view can also make tonal separation easier to judge, but it doesn’t replace exposure measurement. Check skin, bright surfaces and shadow detail in the actual footage.
Optical ND filtration also differs from a brightness adjustment in an editor. Lowering brightness after capture changes the visual presentation, but it can’t restore highlight detail already clipped during recording. A filter reduces light before it reaches the sensor. Review a test clip for consistent exposure, natural colour and retained detail.
Keep the goal specific: preserve the chosen depth of field and motion while recording usable highlights and shadows. If filtration makes the image too dark, reduce the density or revise the exposure settings. If the image remains too bright, increase filtration. This step-by-step assessment connects the filter’s effect to the scene, rather than treating brightness and contrast as interchangeable controls.
Adding filters to video
An ND filter works in front of the lens during recording, reducing light before it reaches the sensor. A digital video effect is added later in editing. These tools serve different purposes: optical ND filtration supports exposure during capture, while an editor’s filter can change colour, contrast or mood in the finished footage.
For a scene with changing light, mount the ND filter securely and inspect the frame before recording. A bright window entering the edge of a wide-angle shot can reveal darkened corners, especially when filters are stacked. To avoid vignetting, use a compatible filter size and remove unnecessary stacked rings. Check all four corners at the widest framing.
Reflections and image-quality loss can also occur when bright sources strike the filter. Keep the glass clean, use a lens hood when it doesn’t obstruct the shot, and adjust the camera angle if a lamp or the sun creates flare. Avoid stacking filters unless necessary, since extra glass surfaces can introduce reflections or reduce contrast.
First, clean an ND filter with a clean blower, then use a suitable lens cloth if marks remain. Store it in its protective case with both surfaces covered. Handle the filter by its edge, avoid touching the glass, and follow the manufacturer’s care instructions to reduce scratches and residue.
For a post-production look, import the footage into a video editor and apply a filter to a copy or adjustment layer. This keeps the original clip available for revisions. Use a restrained colour effect to create visual consistency across interview shots, then fine-tune brightness, contrast and colour instead of relying on a single preset.
On a phone, photo apps may offer basic video filters or brightness and contrast adjustments. For example, an editor can adjust a short Instagram video clip before export. Check that skin tones and highlights still look natural. A download may include a preset or editing app, but review its effect on a test clip before applying it to a full project.
Filters can heighten a natural setting, unify shots or establish a mood. Treat each video effect as a starting point, not a substitute for reviewing the image. Compare the filtered version with the original footage, especially where scenes cut together. Professional editors often keep colour treatment subtle so visual choices support the story rather than distract from it.
Before exporting, play the sequence on the intended device and inspect transitions between filtered and unfiltered shots. If exposure changes abruptly, revisit the edit or original capture rather than masking the mismatch with stronger effects. A consistent review process helps preserve image quality from camera setup through final export.
Adjusting filter intensity
Adjust ND intensity after setting the shutter and aperture for the intended motion and depth of field. The remaining exposure difference indicates how much light reduction the scene needs.
Matching Strength to Lighting
ND strength is measured in stops, but no single stop value suits every lighting condition. Set the camera exposure for the shot, then use its meter or monitoring tools to judge whether the image is still too bright.
In direct sun, a wide aperture may need stronger filtration than in a shaded setting. As clouds pass or the camera moves indoors, reassess the image and adjust the filter. The right intensity restores the intended exposure without changing your chosen aperture or shutter.
Use a repeatable check: frame the subject, set the desired depth of field, and establish the shutter for the intended motion. Then add filtration and review highlights, shadows and skin tones. If the image remains overexposed, increase ND strength; if it becomes too dark, reduce it.
Supporting the Shutter Rule
The 180-degree shutter rule links shutter duration to the frame interval, shaping how motion appears. It doesn’t prescribe an ND strength. Choose the frame rate and matching shutter first, then adjust filtration according to the scene’s light and the aperture you want to retain.
At common frame rates, the required ND depends on the camera settings and available light, not frame rate alone. For example, a bright exterior and a shaded interior may need different filtration despite using the same frame rate and shutter approach.
For a variable ND, rotate the control while watching the image through the camera. Stop when highlights retain detail and the subject looks natural. Check the frame edges for uneven darkening, especially with a wide lens or strong filtration. A fixed ND requires swapping filters rather than rotating a control, so plan for lighting changes between takes.
Make adjustments in measured steps rather than turning the filter rapidly. After each change, inspect a neutral surface and a face for colour shifts. If the scene includes movement against a detailed background, review how the shutter renders that motion before changing shutter duration to solve exposure. Changing the shutter can alter motion effects, while ND intensity reduces incoming light.
In post-production, an editor can add effects to colour or tone, but those adjustments don’t replace exposure decisions during capture. Review a short test clip before recording the full scene. If the image needs a visual treatment, add effects later; keep ND filtration focused on controlling light during capture.
For a continuous shot through changing light, decide whether to adjust the filter during recording or keep a fixed setting and change exposure between takes. Rotating the filter can cause a visible brightness shift, so rehearse the movement and monitor the image. For an interview, consistent intensity across takes usually makes editing cuts easier.
Record the camera settings and filter position for each setup. This helps you recreate the exposure after a lens change or lighting adjustment. The final choice balances filtration, aperture, shutter and scene brightness, rather than relying on a filter label alone.
Available filter styles
ND filters come in several physical formats, each suited to a different camera setup. Choose between fixed, variable and matte-box filters based on lens changes, lighting shifts and production workflow.
A fixed ND filter provides one consistent level of light reduction. It suits a controlled setup, such as a locked camera recording an outdoor interview. Carrying several strengths gives you options, but changing filters takes time when the light changes between takes.
A variable ND rotates to adjust light reduction without removing the filter. It can be practical for documentary work or moving between bright and shaded locations. However, variable models can produce colour shifts, uneven darkening or a visible X pattern at stronger settings, especially across wide-angle frames. Watch for these effects as you rotate the filter, and avoid positions where they appear.
A matte-box ND fits into a holder in front of the lens. This format supports rapid filter changes and works within a rigged camera setup. It’s useful when a production needs repeatable adjustments across takes, but a matte box adds equipment and setup considerations compared with a compact screw-on filter.
Filter size must match the lens thread, usually marked on the lens front or barrel. For lenses with different thread sizes, step-up rings let a larger screw-on filter fit a smaller thread. For example, choose a filter for the largest thread in your lens kit, then use appropriate step-up rings on smaller lenses. Avoid step-down rings, which can obstruct the frame and cause vignetting.
Before using a step-up ring, mount it and check the full frame at the lens’s widest focal length. Inspect the corners for darkening, then test whether the hood or lens cap still fits. A rotating variable filter also needs enough clearance for adjustment. This simple camera check can prevent framing problems during a take.
For a compact mirrorless camera, a screw-on filter may keep the rig simple. A cinema camera with a matte box may benefit from a compatible rectangular filter format. The best fit depends on the lens system and how quickly the crew needs to change filtration, not on editing style or social platform.
Keep capture decisions separate from post-production formats. A filter controls light before recording; editing controls can adjust colour and saturation later. Whether the finished clip is for TikTok or YouTube, review skin tones and transitions between shots before export. These checks help maintain a consistent visual result across the final video.
Choose the format to suit the shoot: fixed filters for stable conditions, variable filters for quick adjustments, or matte-box filters for a rigged workflow. Test the exact lens and filter combination before recording important footage.
Choosing a filter based on the task
Start with the shot’s movement, framing and camera platform, then select filtration that preserves your intended settings. The task determines whether a filter belongs on the lens, drone or phone, and how easily you need to adjust it.
Matching Filters to Camera Types
ND filters differ by mounting method and size across drones, smartphones and mirrorless cameras. A drone may need a dedicated filter that fits its camera assembly, while a smartphone may use a clip-on or case-based mount. A mirrorless camera typically takes a lens-mounted filter matched to its thread or holder.
For each device, check clearance, secure attachment and the full frame before filming. For example, a phone case can prevent a clip-on filter from sitting squarely, while a wide lens can reveal dark corners from a poorly fitted ring. Choose a setup that stays aligned as you move.
Also consider the pace of the task. A fixed camera position may suit a filter that takes time to mount, while a moving drone shot benefits from a compact, secure fit. Test the intended lens, camera movement and framing together, rather than judging the filter on a static image alone.
Choosing Between Filters and Camera Settings
Use an ND filter when you want to preserve aperture or shutter choices but need less light reaching the sensor. For example, keep a wide aperture for a soft background, then add filtration if daylight makes the image too bright. This avoids changing depth of field to solve exposure.
Changing ISO, aperture or shutter can also alter exposure, but each affects the image differently. Raising shutter speed can make motion look less natural; closing the aperture changes depth of field. Choose the control that protects the visual intent, then use ND filtration when the other settings need to stay consistent.
For an interview beside bright windows, set the desired aperture and motion first. If the subject becomes overexposed, add ND rather than pressing an automatic exposure button that changes settings during the take. Review the brightness on the camera display and confirm that highlights retain detail.
Using ND Filters for Video
An ND filter reduces light before it reaches the sensor, helping maintain chosen camera settings in bright conditions. Use one when daylight prevents the intended aperture and shutter combination, such as for an outdoor walking shot where you want motion to look smooth.
For a controlled studio shot, filtration may not be needed if the lighting already supports the chosen exposure. Assess the scene rather than relying on a preset. If light changes during a take, monitor the image and adjust filtration between shots where possible, avoiding visible exposure shifts.
Post-production can sharpen footage or adjust brightness, but those edits don’t replace exposure decisions during capture. Before uploading a finished clip, review skin tones and transitions on the intended screen. A consistent capture approach gives editing more usable material and keeps the final look coherent.
United Broadcast & Media Solutions (UBMS): Professional Video Cameras
United Broadcast & Media Solutions (UBMS) offers professional video and digital cinema cameras for production workflows where exposure control and image consistency matter. The camera body, lens and lighting setup all influence how you manage bright locations and maintain your intended depth of field.
If you’re planning a camera setup, UBMS also offers cinema lenses and professional lighting equipment. Considering these components together can help you assess how filtration fits your shooting needs, from a controlled interview setup to footage captured in changing light. The right choice depends on the camera system, lens configuration and demands of the task.
Contact United Broadcast & Media Solutions to discuss your professional camera requirements.
Plan Your Next Camera Setup
A practical next step in choosing the right ND filter for video is to plan around a real shot. Note the camera and lens, intended aperture and shutter, lighting conditions, and whether light changes during the take. Then test the setup before production. A short test recording can reveal handling issues, unwanted colour shifts or exposure changes that may not be clear in a monitor preview.
Use that test to build a repeatable workflow for your production team. Record the settings alongside the filter choice, then review the footage on the display used for editing. For a multi-camera setup, compare how each camera renders the same scene and adjust the approach to keep shots consistent. This preparation makes filter decisions part of camera planning, rather than an on-set correction made under pressure.
Discuss your camera requirements with United Broadcast & Media Solutions.
Move your next shoot forward with a setup chosen for the task and prepared for the conditions.
Frequently Asked Questions
How do you calculate the correct ND filter using ISO, aperture, shutter speed, and exposure?
Set ISO, aperture and shutter speed to the values your shot requires, then read the camera’s exposure meter. The difference between that reading and your intended exposure indicates the light reduction needed, expressed in stops. Select filtration to match that difference, then record a test and reassess highlights. For example, if the meter shows overexposure, add enough ND strength to bring exposure toward the intended level without changing your chosen settings.
What is the difference between fixed, variable, and electronic ND filters for video?
A fixed ND filter provides one set level of light reduction, so changing strength means swapping filters. A variable ND adjusts through rotation, allowing continuous changes without removing it. An electronic ND changes density through electronic control rather than a manual rotating ring. The practical distinction is how you adjust filtration: by replacing a filter, turning a control or using an electronic system integrated with the camera setup.
What ND filter strength is needed for the 180-degree shutter rule at common frame rates?
The 180-degree shutter rule doesn’t prescribe an ND strength. Choose filtration based on available light and the aperture you want to retain; frame rate alone doesn’t determine it.


