

How to clean a professional camera sensor safely
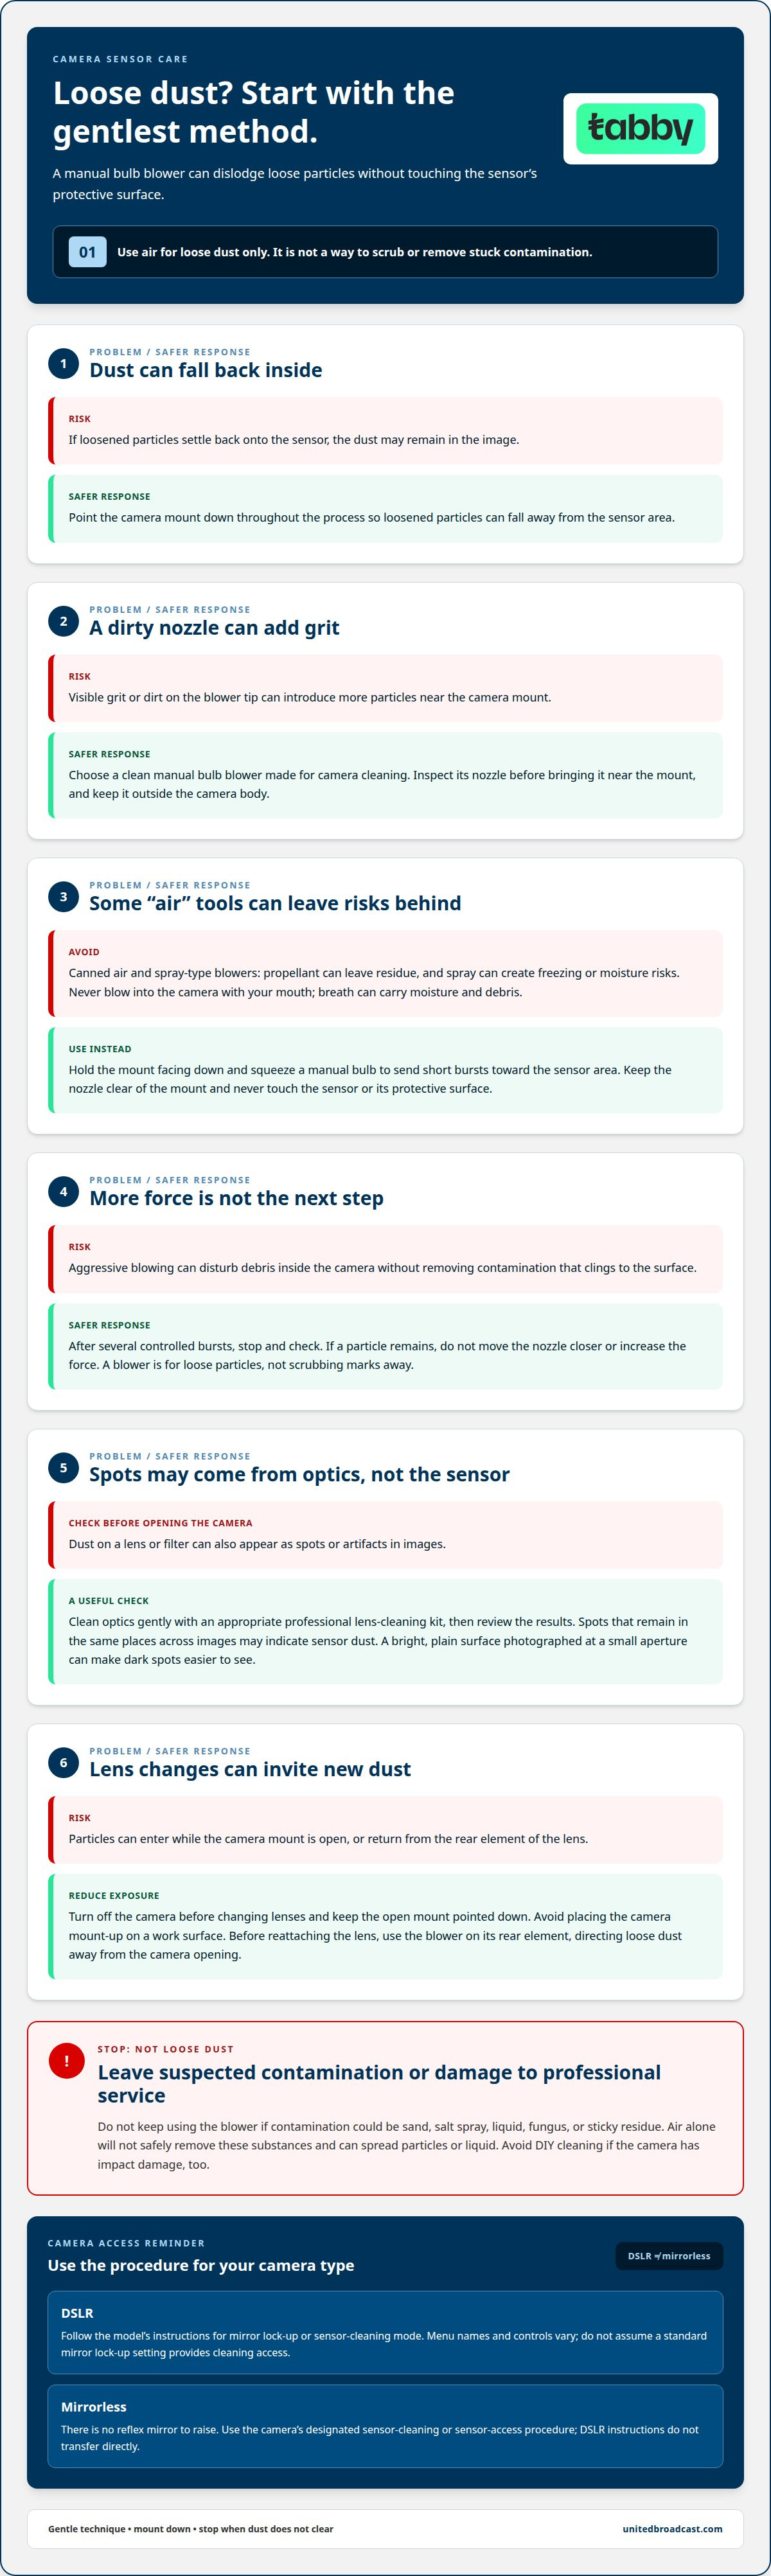
A manual bulb blower can be a safe first tool for loose sensor dust, but never use canned air. To learn how to clean a professional camera sensor safely, point the camera mount down while blowing so dislodged dust is less likely to settle back on the sensor. Never blow into the camera with your mouth.
It’s sensible to be cautious: the sensor’s protective surface is delicate, and the wrong tool or cleaning fluid can leave marks or cause damage. This guide explains when to use the camera’s built-in cleaning mode, how mirror lock-up provides access on a DSLR, and when sensor swabs and purpose-made fluid may help with stubborn dust. You’ll also learn how to check whether spots are coming from the sensor, which cleaning tools to avoid, and when contamination is better handled through professional camera service.
Key Takeaways
- Use a manual bulb blower for loose dust, keeping the camera mount pointed down; avoid canned air and blowing into the camera with your mouth.
- Use the camera’s built-in cleaning mode for loose particles, and follow the camera’s instructions when using mirror lock-up on a DSLR.
- Keep microfiber cloths, lens pens, household cleaners, and lens-cleaning liquids away from the sensor’s protective surface.
- For stubborn dust, choose a sensor swab that matches the sensor size and use purpose-made fluid sparingly.
- Leave suspected sand, liquid, salt spray, fungus, sticky contamination, or impact damage to professional service.
Can I Use A Blower To Remove Dust From Camera Sensor Surfaces?
Yes. A clean manual bulb blower can dislodge loose dust without touching the sensor’s protective surface. Point the camera mount down so loosened particles can fall away instead of settling back inside.
-
Prepare a Bulb Blower
Choose a manual bulb blower made for camera cleaning, then inspect its nozzle before bringing it near the camera mount. The nozzle should be clean and free of visible grit; a dirty tip can add particles instead of removing them. Keep the blower outside the camera body, and don’t use canned air or spray-type blowers. Propellant can leave residue, and the spray can create freezing or moisture risks.
-
Use a Manual Blower Technique
Hold the camera with its lens mount facing down, then squeeze the bulb to direct short bursts of air toward the sensor area. Keep the nozzle clear of the mount and avoid contact with the sensor or its protective surface. Don’t blow into the camera with your mouth: breath can carry moisture and debris into the body. After several controlled bursts, stop and check whether the loose dust has cleared.
- Use the blower to dislodge loose particles, not to scrub marks away. Dust can shift as the camera changes orientation, so keep the mount facing down throughout. If a particle remains after gentle bursts, don’t move the nozzle closer or increase the force. Aggressive blowing can disturb debris inside the camera without removing contamination that clings to the surface.
- Before opening the camera, check whether the marks are likely to come from the sensor. Dust on a lens or filter can also appear as spots or artifacts in images. If needed, clean the optics gently with an appropriate professional lens-cleaning kit, then review the results. Spots that remain in the same places across images may indicate sensor dust; a bright, plain surface photographed at a small aperture can make dark spots easier to see.
- Reduce new dust during lens changes by turning off the camera and keeping the open mount pointed down. Once the sensor area is exposed, avoid placing the camera mount-up on a work surface. Before reattaching the lens, use the blower on its rear element, directing loose dust away from the camera opening. These handling steps help keep particles from returning to the sensor area.
- Stop using the blower if the contamination could be sand, salt spray, liquid, fungus, or sticky residue. Air alone won’t safely remove these substances, and further attempts can spread particles or liquid. Avoid DIY cleaning if the camera has impact damage, too. A bulb blower is for loose dust; persistent spots or suspected contamination require a different cleaning method.
Cleaning DSLR sensors with mirror lock-up
On a DSLR, mirror lock-up or sensor-cleaning mode raises the mirror to expose the sensor area. The correct access method depends on whether the camera has a mirror.
- Identify whether your camera is a DSLR or mirrorless model before opening its lens mount. A DSLR has a mirror box, so the mirror must move aside for sensor access. A mirrorless camera has no reflex mirror to lock up. Don’t assume that both designs use the same menu command or cleaning sequence.
- Check the DSLR’s instructions for its specific mirror lock-up or sensor-cleaning procedure. Menu names and controls vary by model, so follow your camera’s instructions rather than guessing. Confirm that the selected mode is intended for sensor access. A standard mirror lock-up setting for photography may not provide the access needed for cleaning.
- Prepare the camera before activating mirror lock-up. Remove the lens in a clean work area, then position the camera so loose dust can fall away from the sensor opening. Avoid touching the mirror, shutter curtain, or sensor’s protective surface. These parts are delicate, and mirror lock-up provides access, not permission to handle internal components.
- Activate the DSLR’s sensor-access mode only when the camera is ready. The mirror moves aside, leaving the sensor area accessible for the cleaning method allowed by the camera instructions. Keep the camera steady and avoid changing settings or handling the mirror while it is raised. If the mirror doesn’t move as expected, stop and review the model-specific procedure.
- Choose a cleaning method suited to the particles and the camera’s instructions. Loose dust may respond to a manual blower; stuck marks need a different approach. Don’t rest a tool on the mirror, and never press against the sensor. If you’re unsure whether a component is the mirror or sensor, pause rather than risk contact.
- Return the DSLR to its normal operating state using the camera’s prescribed exit procedure. The mirror must return to its normal position before you resume shooting. Follow the instructions rather than forcing a control or moving parts by hand. After reattaching the lens, check a test image for persistent spots before deciding whether further cleaning is needed.
- For a mirrorless camera, skip mirror lock-up and use its designated sensor-cleaning or sensor-access procedure. The body has no mirror to raise, so DSLR instructions don’t transfer directly. Menu controls and access steps vary by model. If you’re choosing a camera for a production workflow and need help with camera options, contact the camera team.
Sensor-cleaning tools to avoid
The main risks are scratches, smears, residue, and damage to coatings on the sensor’s protective glass. These can affect captured images and may be difficult to remove safely.
- Keep microfiber cloths away from the sensor surface. Their fibres can trap dust and grit, then drag those particles across the protective glass. A cloth that looks clean may still hold debris from a lens or work surface. Use microfiber only where it’s suitable for external camera parts, never as a substitute for sensor-cleaning materials.
- Don’t apply lens-cleaning liquid or general-purpose screen cleaner to the sensor. These products are made for other surfaces and can leave residue or worsen contamination. Even a small amount may spread across the protective glass rather than lift a particle. When wet cleaning is appropriate, choose fluid made specifically for camera sensors.
- Keep lens pens out of the camera body. Their cleaning tips can transfer grease or particles to the sensor’s protective surface, causing smears or scratches. A lens pen is designed for lens surfaces, not sensor cleaning. Don’t adapt a tool for another task just because it fits through the lens mount.
- Avoid household products such as glass cleaner and alcohol wipes. They can leave residue or damage coatings, making sensor marks harder to address. Don’t use paper towels, tissues, or other improvised wiping materials either. They aren’t designed for the sensor surface and can introduce fibres or abrasive particles on contact.
- Use each cleaning tool only on the camera surface it’s designed for. A lens brush, cloth, or solution that has touched another component may carry grit or oil. Keep sensor-cleaning supplies clean and separate from lens-care items. If you don’t have the right sensor-specific tool, pause rather than substitute a household or general-purpose product.
- Stop if cleaning seems to require pressure or repeated rubbing. Contact with the protective glass can turn loose grit into a scratch, while excess liquid may leave wet spots or residue. Avoid DIY cleaning if the sensor has sticky contamination, liquid, sand, salt spray, or suspected fungus. These conditions require a different assessment from ordinary loose dust.
Using the camera’s built-in sensor cleaning mode
Use the built-in cleaning mode to vibrate the sensor and help dislodge loose dust. Choose professional sensor cleaning if contamination persists, the camera is exceptionally dirty, or you’re uncomfortable cleaning it yourself.
- Find the sensor-cleaning option in your camera’s menu before removing the lens. Menu names and controls vary by model, so follow the camera’s instructions. The mode may run automatically when the camera starts or shuts down, or require manual activation. Confirm which operation you’re selecting before proceeding.
- Fully charge the camera battery before starting a cleaning cycle. The camera needs power to complete the vibration and shutdown sequence. If power fails during shutdown, camera movement can pose a risk while the sensor is exposed. Don’t start with a low battery or interrupt the cycle once it begins.
- Place the camera securely on a stable surface, then activate its sensor-cleaning mode. The mechanism vibrates the sensor to help shake off loose dust; it doesn’t wipe the surface or remove every kind of contamination. Keep the camera still while the cycle runs, and let the mode finish without pressing other controls.
- Check whether the cleaning cycle improved image spots before repeating it. Photograph a plain, bright surface at a small aperture, then compare the dark marks across the frame. Dust that remains in the same position may still be on the sensor. Don’t repeat cycles automatically when the first attempt hasn’t cleared persistent marks.
- Use a manual blower only if loose dust remains and the camera’s instructions permit access. A built-in cycle and a blower serve different purposes: vibration may dislodge particles, while gentle airflow can move loose dust away. Neither method requires touching the sensor surface. Avoid improvised tools or fluids during this check.
- Arrange professional cleaning if spots remain after appropriate basic methods or if you’re uncomfortable exposing the sensor. Professional service is also safer for an exceptionally dirty camera or suspected sand, salt spray, liquid, fungus, or sticky residue. These conditions differ from loose dust and may require more than a vibration cycle.
- Return the camera to normal operation using its menu instructions, then carefully reattach the lens. Review another image under the same conditions as the earlier check. If marks persist, stop repeating the built-in cycle and choose a suitable cleaning method or professional service instead. Sensor-cleaning mode helps with loose particles, not every mark.
Wet cleaning with sensor fluid and swabs
A safe approach to cleaning a professional camera sensor starts with choosing a swab made for the camera’s sensor size. A smaller swab may leave streaks across a larger sensor, so match the tool to the sensor format before opening the camera.
- Check the swab packaging to confirm the sensor size it’s designed to clean. A correctly matched swab can pass across the sensor surface in a controlled motion. A smaller swab may leave fluid or streaks on the uncovered area. Don’t use a swab intended for another format just because its size looks close.
- Choose purpose-made sensor-cleaning fluid, not lens-cleaning fluid. Sensor fluid is intended for this surface, while lens fluids and general-purpose cleaners can leave residue or worsen marks. Keep sensor supplies separate from lens-care products to avoid picking up the wrong liquid during cleaning.
- Prepare the camera according to its sensor-access instructions before opening the swab. Keep the body stable and the mount positioned to allow a controlled pass. Open the swab only when you’re ready to use it. A clean workspace helps reduce the chance of transferring dust or debris to the cleaning edge.
- Apply a small amount of sensor fluid to the swab, following the product directions. Too much solution can leave wet spots on the protective surface. The swab should be damp, not dripping. Don’t pour fluid directly onto the sensor or automatically add more if a mark remains.
- Move the swab across the protective surface in one smooth pass. Keep the motion steady without stopping to scrub a visible spot or pressing down. Lifting and restarting can spread residue or create streaks. Complete the pass, then remove the swab from the camera rather than reversing direction with the same cleaning edge.
- Inspect the result with a test image before deciding whether another attempt is needed. Look for persistent spots or streaks in the image, not only on the exposed sensor. If the result remains uneven, avoid repeated rubbing or excess fluid. Suspected sand, liquid, salt spray, fungus, or sticky contamination calls for professional attention.
- When cleaning a professional camera sensor safely, stop if a swab catches, leaves a smear, or fails to lift contamination in a controlled pass. Continuing can spread residue or introduce particles. If marks persist on a camera used for production, seek service support rather than repeating wet-cleaning attempts.
United Broadcast & Media Solutions (UBMS)
United Broadcast & Media Solutions (UBMS) supplies professional cameras and production equipment, and provides technical support and repairs through its dedicated service center. If recurring sensor contamination prompts a review of your setup, UBMS offers Professional Video Cameras, Digital Cinema Cameras, Cinema Lenses, and Professional Lighting Equipment. Choose equipment to suit your production requirements and workflow, not as a substitute for cleaning. If a sensor remains marked after careful cleaning, avoid further attempts that could damage its protective surface. Contact UBMS to discuss your camera equipment requirements and next steps.
Keep Your Camera Ready for the Next Shoot
Make sensor care part of your camera’s regular handling routine, not a last-minute fix before a critical production. If image spots persist or contamination looks unusual, stop before trying again and consider the risk to the sensor’s protective surface. Knowing how to clean a professional camera sensor safely also means recognizing when to seek professional support instead of doing more hands-on work.
For broader equipment planning, United Broadcast & Media Solutions offers Professional Video Cameras, Digital Cinema Cameras, and Cinema Lenses. Matching camera and lens choices to your workflow helps align your production kit with the images and operation you need.
Approach each cleaning decision with care, and keep your camera ready for the work ahead.
Frequently Asked Questions
How Do I Know If My Camera Sensor Is Dirty?
Look for dark spots that stay in the same position across images, especially in photos of a plain, bright surface at a small aperture. Compare several frames rather than relying on one. A mark that changes with the scene may come from the subject, lens, or filter instead. For footage, inspect a frame with an even background and consistent exposure to make fixed sensor marks easier to identify.
Is Wet Cleaning Safe For Beginners?
Wet cleaning can be risky if you’re unsure about the tools or technique. It involves placing a sensor-sized swab against the sensor’s protective surface, so don’t start if you’re uncomfortable or can’t identify the correct swab. Loose dust is different from sticky residue or suspected liquid contamination. In those cases, don’t experiment with fluid; professional cleaning is the safer next step.
How can you tell if a professional camera sensor needs cleaning?
A sensor needs attention when dust is visible in images and affects the material you plan to use. Check for fixed marks on a plain, bright test frame, then review actual footage or stills for distracting spots in important image areas. A mark visible only in a test frame may not affect every shot. Base your decision on recorded results and production needs, not solely on dust visible inside the camera.
What tools are safe for cleaning a professional camera sensor?
For sensor care, use a clean manual bulb blower for loose dust, or a sensor-specific swab and fluid when wet cleaning is appropriate. A purpose-made sensor brush can attract and lift dust using static charge. Keep lens-care supplies separate: a lens brush or lens fluid isn’t automatically suitable for a sensor. Choose tools that match the sensor size and the type of contamination.
How do you use a sensor cleaning swab step by step?
First, confirm that the swab matches your sensor size and its packaging is clean. Apply a small amount of purpose-made sensor fluid according to the product directions. With the sensor accessible, move the swab steadily across its protective surface in one smooth pass, without scrubbing or pressing hard. Remove the swab after the pass, then inspect a test image. Don’t reuse a contaminated swab or add excess fluid.
Is it safe to clean a camera sensor with a blower, brush, or canned air?
A clean manual bulb blower is suitable for loose dust when used without touching the sensor. A sensor brush designed to attract dust with static charge is another option when used carefully. Avoid canned air: spray-type products can leave propellant residue and create freezing or moisture risks. Don’t blow into the camera with your mouth, since breath can introduce debris. Stop if particles appear embedded or the contamination is sticky.
What liquids can safely be used to clean a camera sensor?
Use only fluid made specifically for sensor cleaning, follow its directions, and apply it sparingly to the swab. Lens-cleaning liquid, screen cleaner, glass cleaner, and alcohol wipes aren’t suitable substitutes; they can leave residue or harm coatings. If the sensor is already contaminated with liquid, don’t add another fluid in an attempt to remove it. Stop DIY cleaning and arrange professional service for suspected liquid or other unusual contamination.
How can you test for sensor dust before and after cleaning?
Photograph the same plain, bright surface before and after cleaning, using consistent focus, framing, exposure, and a small aperture. Compare the images for dark marks that remain in matching positions. A consistent setup helps distinguish changes in sensor dust from differences in the scene or camera settings. A test frame is a diagnostic aid; also review production images to judge whether any remaining spots affect your work.


