

Negative Fill for Cinematic Depth: A Lighting Guide
What if a scene needs less light to feel more dimensional, not darker? When bounce from bright walls or reflective surfaces fills in a subject’s shadows, adding another light or changing exposure won’t address the source of the flatness. Using negative fill for cinematic depth means controlling that reflected light so contrast can shape the image without sacrificing the exposure you need.
If you’re unsure how negative fill differs from underexposing a shot, or how far to reduce fill before shadow detail disappears, a repeatable approach can help. This guide explains how negative fill affects contrast and perceived depth, then walks through positioning a dark surface with the grip tools available on set. You’ll also learn how to assess shadows through the camera and make small adjustments before rolling, especially in bright or reflective locations.
Key Takeaways
- Using negative fill for cinematic depth helps control reflected light and shape contrast without relying on underexposure.
- Follow a repeatable setup: assess the key light and subject position, locate unwanted bounce, place a dark surface, then evaluate the result.
- Compare negative fill with adding fill, repositioning the key, or adjusting exposure to choose the right control for the scene.
- Check faces, wardrobe, background, and frame edges before rolling. Deepen shadows only while preserving the detail the shot needs.
- Build a consistent workflow around the scene’s intended contrast. Test and document the setup instead of following a fixed formula.
What Negative Fill Does for Cinematic Depth
Negative fill doesn’t add illumination, and it isn’t the same as lowering camera exposure. It controls light already reaching the subject by reducing reflected fill from the environment. Instead of changing the whole image, it lets you shape the shadow side locally and decide how much contrast the scene needs.
Negative fill is the use of a dark surface, placed strategically, to absorb or block unwanted reflected light and deepen shadows. This subtractive approach can make facial contours more visible and help a subject read separately from a bright or visually busy background. A useful overview of the technique appears in the discussion of subtractive lighting, contrasted with conventional fill that adds illumination to shadows.
How reflected fill changes a scene
Light doesn’t stop at the subject. It can bounce off nearby walls, floors, ceilings, and even light-coloured clothing, then return to the shadow side. In a bright room, that ambient bounce may soften facial contrast even when the key light is positioned carefully.
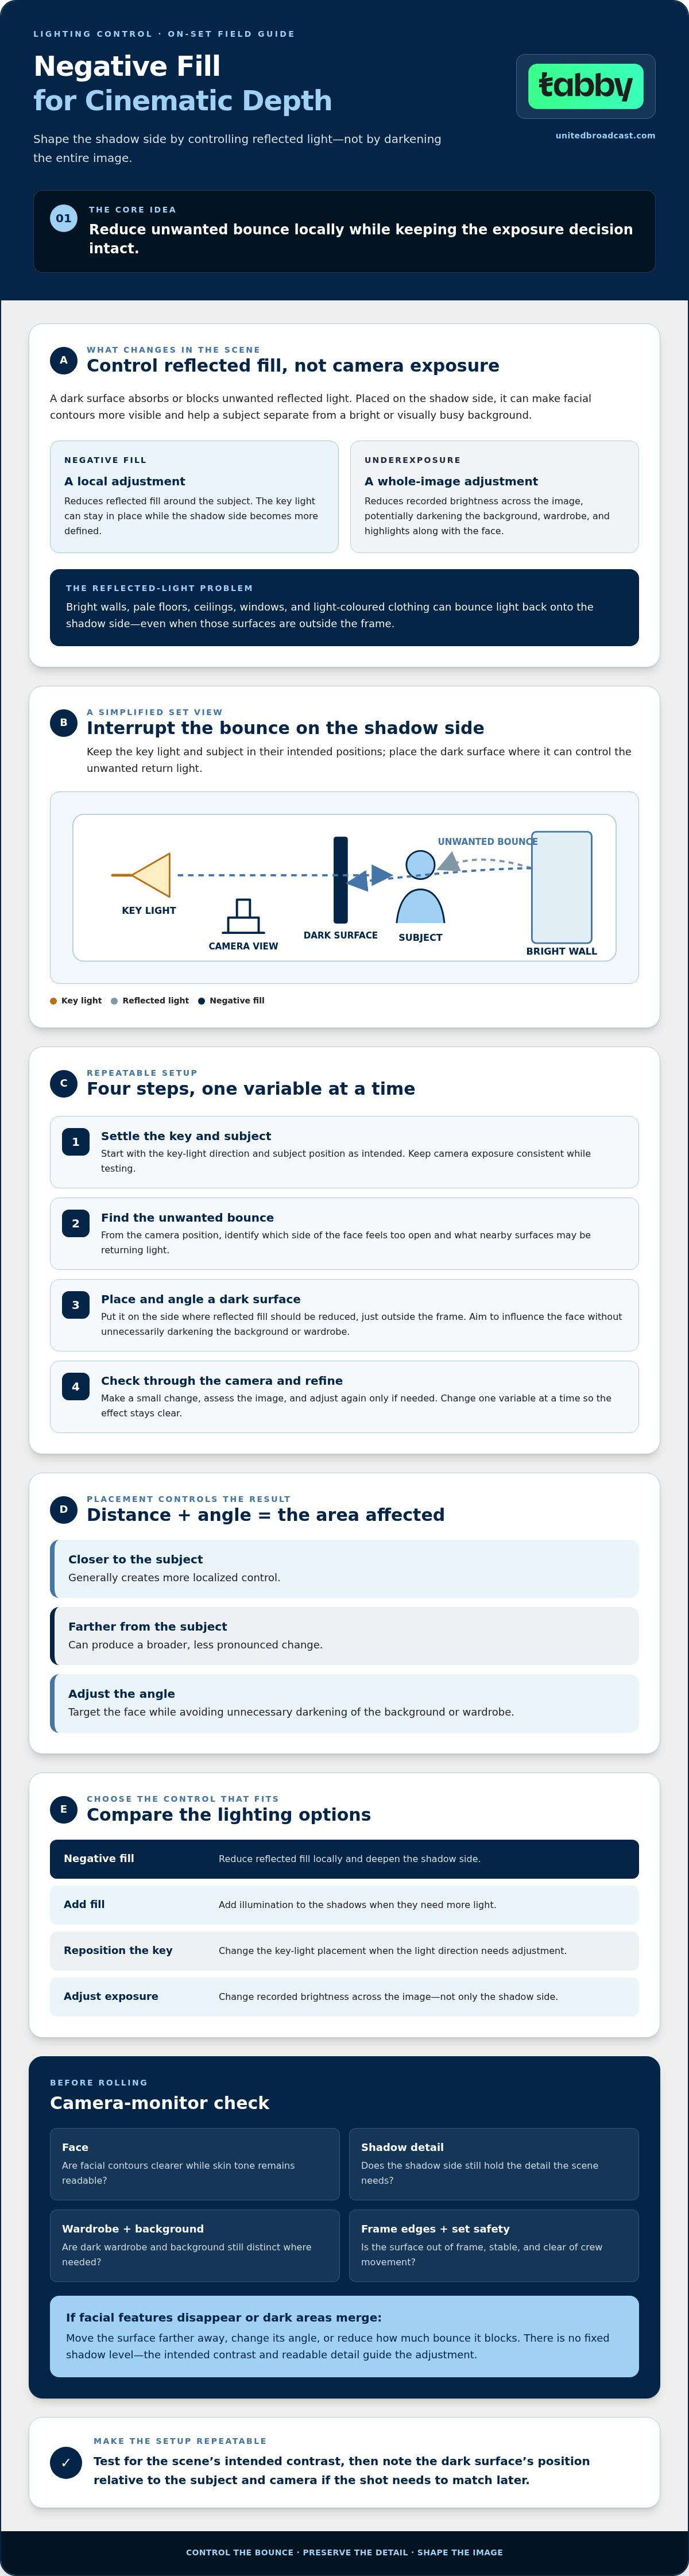
Picture a subject beside a white wall, with a key light illuminating one side of their face. The wall reflects some of that light onto the other side, lifting the shadows. Place a dark surface between the wall and the subject, just outside the frame, and less reflected light reaches the face. The key remains in place while the shadow side becomes more defined. That added contrast can create a stronger sense of shape and separation without introducing another lighting source.
Negative fill versus underexposure
Underexposure reduces recorded brightness across the image. Negative fill instead changes the local balance of light around the subject. If you lower exposure to darken one cheek, you may also lose brightness in the background, wardrobe, and highlights. Controlling bounce gives you a more targeted adjustment while preserving the overall exposure decision.
After positioning a flag or other dark surface, check the image through the camera rather than judging only by eye on set. Watch the skin tone and confirm that the shadow side still carries the detail the scene requires. If facial features disappear or dark wardrobe merges into the background, move the surface farther away, change its angle, or reduce how much of the bounce it blocks.
There’s no fixed shadow level that makes a shot cinematic. The right contrast depends on the scene, the chosen exposure, and the visual intention. Using negative fill for cinematic depth is a controlled lighting decision: reduce unwanted reflected fill while keeping important shadow information readable.
How to Set Up Negative Fill on Set
A repeatable setup makes the effect easier to judge and keeps each lighting decision deliberate. Start with the key light and subject in their intended positions, then assess what the environment is adding before introducing a dark surface. Keep camera exposure consistent while testing so you can see how the change affects the scene.
Find the bounce before placing the flag
Look for surfaces that may be returning light toward the subject: bright walls, pale floors, ceilings, windows, or light-coloured wardrobe. From the camera position, observe which side of the face feels too open and whether ambient bounce is also lifting the background. A surface can brighten shadows even when it’s outside the frame.
Change one variable at a time. If you move the key light and place negative fill together, it becomes difficult to tell which adjustment shaped the image. First settle the key-light direction and subject position. Then identify the area where reflected light is softening contrast.
Position and evaluate the negative fill
Place a dark surface on the side where you want to reduce reflected fill, keeping it outside the frame. Its distance and angle affect how much of the scene it influences. Moving it closer generally makes the control more localized; moving it farther away can produce a broader, less pronounced change. Rotate it to target the face without unnecessarily darkening the background or wardrobe.
After each adjustment, check the camera monitor. Compare the shadow side of the face, background separation, and frame edges. Look for unwanted dark material in the shot, as well as shadows that have become too dense for the intended look. Make a small change, reassess, and only then adjust again.
Setup sequence: assess the existing key light, identify unwanted bounce, place the dark surface where it can control that bounce, then evaluate the image through the camera and refine the position.
Before securing the setup, confirm that the surface is stable, clear of the frame, and not obstructing crew movement. Using negative fill for cinematic depth is most predictable when you can reproduce the placement, so note its position relative to the subject and camera if you’ll need to match the shot later.
If you’re evaluating professional lighting equipment as part of a broader control workflow, you can discuss your equipment requirements with the UBMS team.
Choose the Right Negative-Fill Approach for the Scene
Choose the adjustment that addresses the cause of the problem. If a face looks flatter than intended because surrounding surfaces are bouncing light into the shadows, negative fill can reduce that unwanted return while preserving the key light’s direction. If the key is coming from the wrong angle, changing its position is more direct. If the whole image is too bright or too dark, assess exposure instead.
Using negative fill for cinematic depth is a considered choice, not a rule for every lighting ratio. A soft, low-contrast look may suit the scene. The goal is to match the visual intention, not to make every shadow deeper.
When negative fill is the useful choice
Assess the room as well as the lighting setup. Light-coloured walls, reflective surfaces, or pale wardrobe can return light toward a subject and soften facial contrast, though their effect depends on their position and the scene’s light. If that bounce is reducing the sense of direction from your key, placing a dark surface to control it may restore shape without changing the key itself.
When to adjust another part of the lighting
Use added fill when the shadow side needs more detail or readability. Reposition the key if its direction or quality is creating the unwanted look. Adjust exposure when the image’s overall level needs correction, not as a substitute for controlling one local area. Make the change that addresses the source, then review the image again.
| Approach | Control and visual effect | Practical limitation |
|---|---|---|
| Negative fill | Reduces reflected light in a selected area; can deepen shadows and preserve key direction. | May remove more shadow detail than intended if placed too close or aimed too broadly. |
| Added fill light | Lifts shadows and supports detail where the image feels too contrasty. | Introduces another light source to position and balance. |
| Repositioned key | Changes the direction or quality of the primary light across the subject. | Can alter highlights and background lighting as well as facial shadows. |
| Exposure adjustment | Raises or lowers brightness across the recorded image. | Doesn’t selectively control reflected fill on one side of the subject. |
Use the comparison as a starting point, then judge the result in the camera image. A scene may benefit from more than one adjustment, but make changes deliberately so you can identify what each one contributes.
Troubleshoot Negative Fill Without Losing Shadow Detail
Darker shadows aren’t automatically better or more cinematic. The aim is controlled contrast that supports the scene while keeping important information visible. If a face loses expression or dark wardrobe blends into the background, reassess the setup. That isn’t proof that the image has more depth.
Diagnose shadows that look too heavy
Check the negative-fill surface first. If it’s close to the subject, large relative to the area you’re controlling, or angled across too much of the scene, it may be reducing more bounce than intended. Move it farther away or adjust its angle, then compare the image on the camera monitor.
If the shadows still feel wrong, consider whether the source is actually the flag. The key light may be too far to the side, or the overall exposure may not suit the scene. Correct the cause rather than compensating automatically. If the shot needs more shadow detail, ease the negative fill or introduce controlled fill where it supports the visual intention.
- Face: Check that facial features remain readable on the shadow side.
- Wardrobe: Make sure dark clothing retains the separation and detail the shot requires.
- Background: Confirm the change hasn’t created an unintended dark patch or flattened subject separation.
- Frame edges: Look for the flag itself, its shadow, or an uneven change in brightness near the edge of frame.
Make one adjustment at a time, then review the image again. Moving the flag can refine contrast without rebuilding the entire lighting setup. Using negative fill for cinematic depth works best as a controlled correction, not a contest to make shadows as dark as possible.
Maintain continuity between takes
Record the flag’s position and angle, subject marks, camera position, and relevant lighting or exposure adjustments. Recheck the image if blocking changes, wardrobe is swapped, or practical lights are switched on or moved. Each change can alter the bounce reaching the subject. Compare the monitor image with adjacent coverage so contrast feels consistent across the sequence, unless a deliberate visual progression calls for a change.
For a broader approach to selecting and using lighting equipment, review this professional lighting equipment guide.
Build a Reliable Lighting Workflow With the Right Equipment Support
A repeatable lighting workflow turns a successful test into a setup the team can reproduce. Start by identifying unwanted bounce, then choose the control method that fits the scene: negative fill, added fill, a key-light adjustment, or an exposure correction. Test the change on camera and document the result. Let the intended contrast guide each decision rather than relying on a fixed formula.
Professional lighting equipment is one part of a coordinated production toolkit. The camera, lens, lighting, grip, and physical environment all affect the image, so consider how equipment choices work together rather than treating one fixture or control method as a complete solution. You can explore the professional lighting equipment collection while planning the lighting tools that fit your workflow.
Turn a lighting test into a repeatable method
Before committing to a full scene setup, test a representative shot with the intended subject position, key light, and background. Make one adjustment at a time, then review its effect on contrast, subject separation, and visible shadow detail. Record what changed, including the position of the negative-fill surface and any relevant exposure or lighting adjustments.
Keep the notes practical: mark where the surface sits relative to the subject and camera, and capture any changes the lighting team needs to reproduce. Share the information with the crew. If blocking or the set changes, repeat the test rather than assuming the original balance will hold.
When to seek equipment guidance
If you’re evaluating equipment, be ready to describe the production environment, the lighting challenge, and the visual result you want. For example, explain whether the setup is in a reflective room, whether the subject needs more defined facial contrast, and what equipment is already part of the workflow. This gives the team useful context without presuming a specific tool is required.
United Broadcast & Media Solutions supplies professional lighting equipment and broadcast studio gear, with system integration and equipment support. The business sells equipment and does not provide equipment rentals or video production services. For questions about professional equipment or technical requirements, contact the UBMS team.
Shape Your Next Shot With Intent
Using negative fill for cinematic depth is about controlling unwanted bounce, not simply making an image darker. Start by assessing the existing light, place a dark surface where it can reduce reflected fill, and review the result through the camera. Then refine the setup to preserve the shadow detail and contrast the scene needs.
Choose the right adjustment for the cause: negative fill to reduce ambient bounce, added fill to support shadow detail, a key-light change to alter direction, or an exposure adjustment when the overall image level needs correction. Test and document your choices so the lighting team can maintain continuity across shots.
United Broadcast & Media Solutions supplies professional lighting equipment and technical support. If you’re considering equipment for a coordinated lighting workflow, the UBMS team can help you discuss your requirements.
Keep testing with purpose. Each considered adjustment brings you closer to the depth and visual balance you intend.
Frequently Asked Questions
What is negative fill in cinematography?
Negative fill is a way to reduce unwanted reflected light by placing a dark surface near the subject. The surface absorbs or blocks some ambient bounce, deepening shadows without adding another light source. Crews use it to shape contrast and retain a more directional look, especially when nearby surfaces are filling in the shadow side. The goal is controlled contrast, not shadows that are dark for their own sake.
How do you use negative fill for cinematic depth?
Start with the key light and subject in position, then identify where reflected light is softening the shadows. Place a dark surface on that side, outside the camera frame, and check the result on the monitor. Adjust its distance and angle to control how much of the subject is affected. Using negative fill for cinematic depth means refining local contrast while preserving the exposure and shadow detail the shot requires.
Does negative fill make an image underexposed?
Not by itself. Negative fill reduces reflected light in a selected area, while underexposure lowers the recorded brightness across the image. After adding a dark surface, check the face, wardrobe, and background on the camera monitor. If important shadow detail disappears, reposition the surface or add controlled fill if the scene calls for it. Keep exposure consistent while testing so you can judge the effect of the lighting change accurately.
What can I use for negative fill?
You can use a dark, non-reflective surface that’s large enough to control the unwanted bounce. Common options include black foam core, duvetyne fabric, a black t-shirt, or a dark moving blanket. Choose based on the area you need to control and the practical conditions on set. Keep the material stable and out of frame, and check that it isn’t creating an unwanted shadow or blocking crew movement.
Where should you place negative fill?
Place negative fill on the side where reflected light is lifting shadows more than you want, often opposite the key light. Position it outside the frame and adjust its angle to target the subject without darkening the background unnecessarily. Check the image from the camera position as you move it. The right placement depends on the key direction, nearby reflective surfaces, subject position, and the contrast intended for the shot.
When should you use negative fill instead of a reflector?
Use negative fill when the shadow side already receives too much bounced light and you want to reduce it. A reflector does the opposite: it redirects light onto the subject, which can lift shadows and reveal more detail. Check the scene before choosing. If you need deeper, more directional contrast, subtract reflected fill; if the shadows need support, use a reflector or another controlled fill source instead.
Can negative fill be used outdoors?
Yes. Outdoors, negative fill can reduce ambient light bouncing from nearby pale walls, ground, or other bright surfaces. Position a dark surface on the side where you want less reflected fill, then assess the face and background through the camera. Outdoor light and surroundings can change with location or blocking, so recheck the contrast when the subject or setup moves. Ensure the surface is secure and doesn’t obstruct the shot or crew.


