

What is a LUT and How to Use It: The Professional Filmmaker's Guide
A Look-Up Table is not a creative shortcut or a simple filter designed to hide poor exposure; it is a mathematical precision tool that acts as the bridge between high-dynamic-range RAW capture and a professional delivery. If you've ever looked at a monitor filled with flat, desaturated Log footage and felt the pressure of ensuring a consistent look across a multi-camera production, you understand the stakes of modern cinematography. Learning exactly what is a LUT and how to use it is the key to moving past the guesswork of "gray" images and toward a predictable, high-end visual result.
We know that shooting in Log is essential for preserving detail, yet the lack of immediate visual feedback often makes it difficult to judge lighting and exposure accurately on set. This guide will help you master both the technical and creative applications of LUTs to streamline your workflow from the initial shoot to the final grade. We will examine how to implement these tools for precise on-set monitoring, how to match different camera sensors, and how to apply them in post-production to achieve a cinematic look without introducing digital noise or over-processing your image.
Key Takeaways
- Understand how LUTs function as mathematical translation tools to convert high-dynamic-range sensor data into accurate, human-readable color spaces.
- Learn exactly what is a LUT and how to use it to distinguish between technical conversion tables and creative film emulations for professional storytelling.
- Discover the critical post-production sequence that prioritizes exposure and white balance correction before applying any look-up tables to preserve image integrity.
- Explore the technical process of integrating custom LUTs directly into professional cinema cameras and monitors for precise, real-time visualization on set.
- Master the techniques for achieving a unified visual style across complex, multi-camera productions using calibrated monitoring and professional-grade cinema lenses.
Understanding the Basics: What is a Look-Up Table (LUT)?
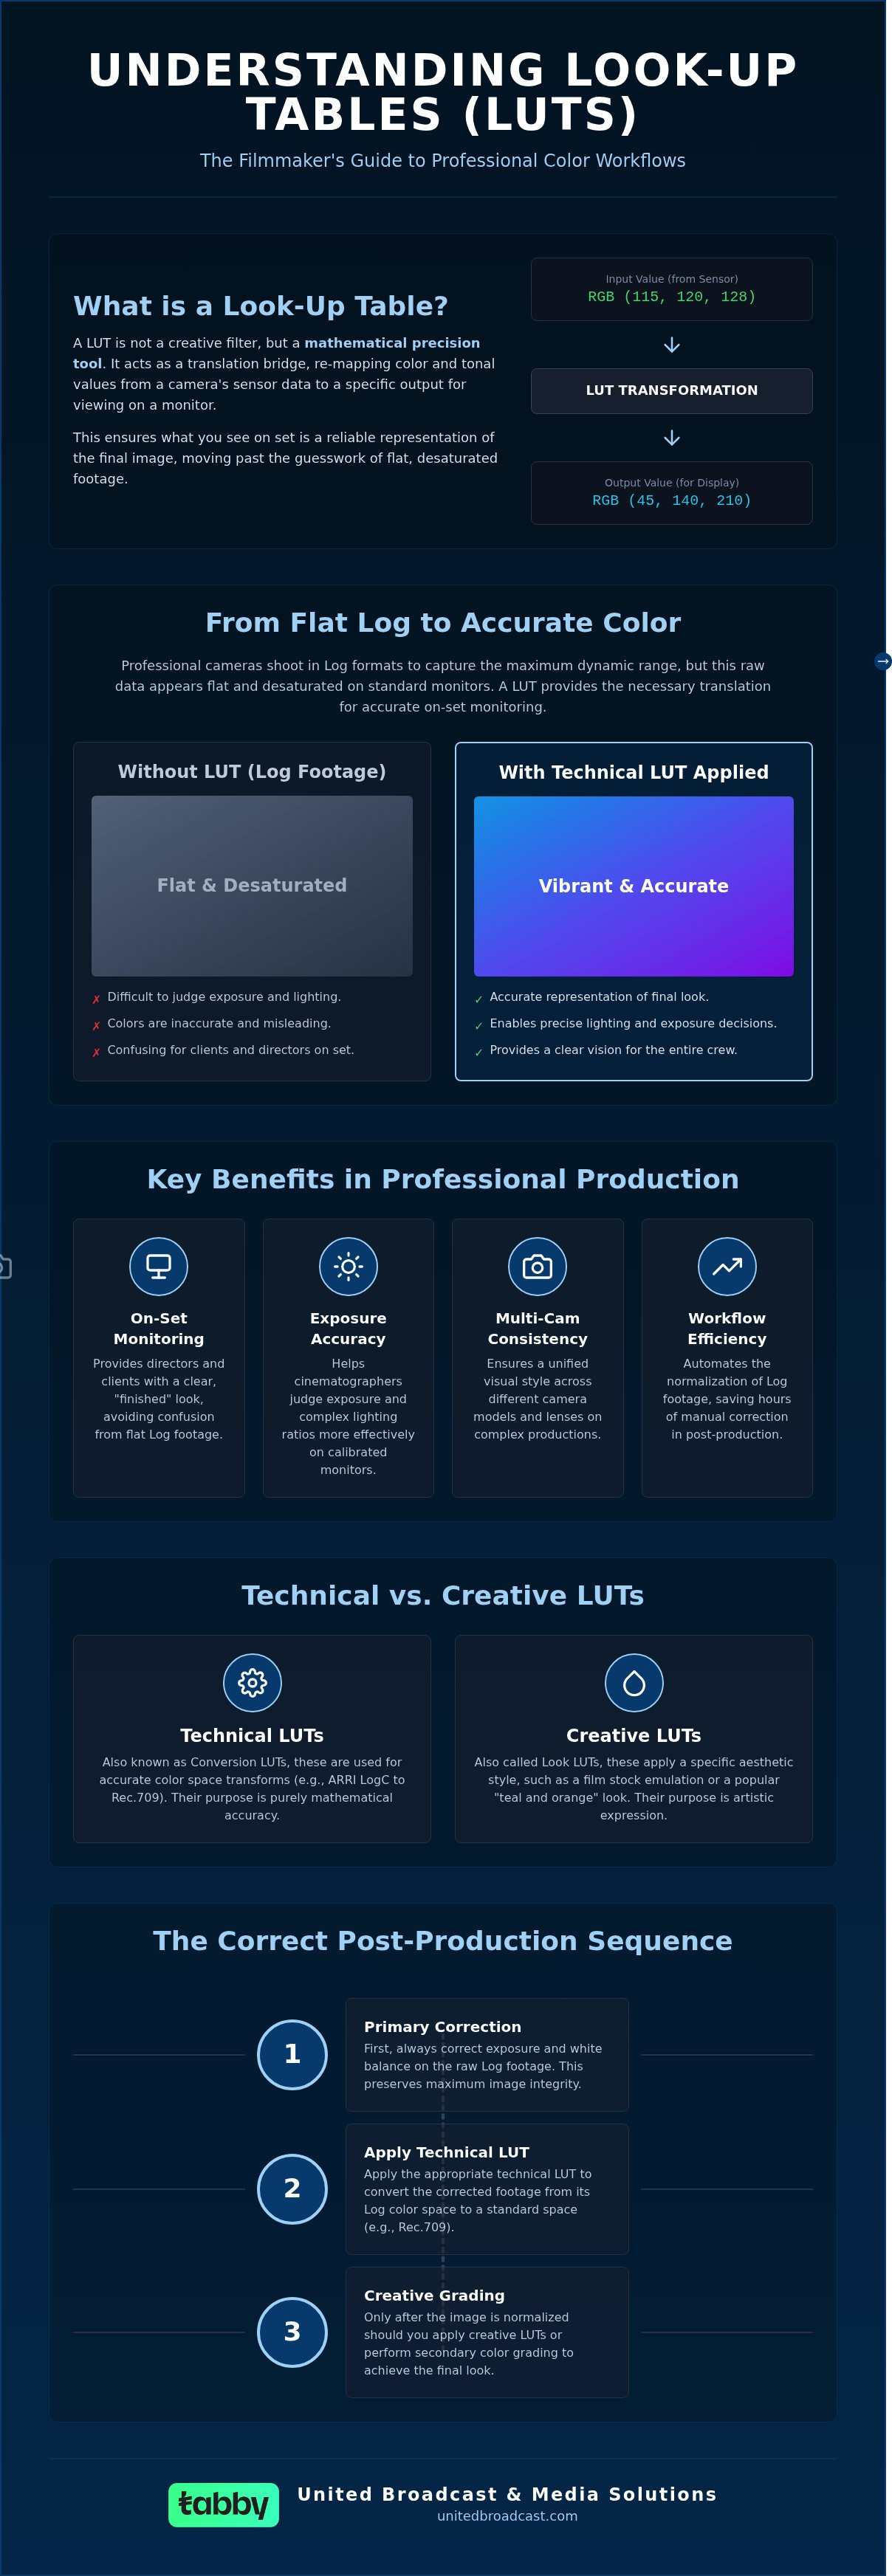
A LUT is a fixed numerical array used to re-map the color and tone of an image. At its most fundamental level, it functions as a mathematical formula that maps specific input color values from your camera sensor to precise output values for display. Understanding what is a LUT and how to use it is essential for any filmmaker working with modern digital sensors, as these tools act as the primary translation layer between raw data and human-readable images.
High-end professional video cameras often capture footage in Logarithmic (Log) formats to preserve the maximum possible dynamic range. While this data-rich footage is ideal for post-production, it appears flat, gray, and desaturated on a standard monitor. The LUT provides the necessary "translation" to restore contrast and color saturation, allowing the production team to see an accurate representation of the final intended look during the acquisition phase.
The Mathematical Shortcut for Color Transformation
A LUT operates by calculating RGB values to modify the hue, saturation, and brightness of every pixel in a frame. While manual color grading involves adjusting individual parameters like lift, gamma, and gain, a LUT performs these complex coordinate re-mappings simultaneously. This makes them significantly more efficient than manual adjustments for repetitive tasks. In professional environments, 3D lookup tables (3D LUTs) are the industry standard because they map colors across a three-dimensional cube, offering much greater precision than 1D versions that only affect brightness.
It's vital to distinguish a LUT from a standard image filter. While a filter often acts as a creative overlay with varying opacity, a LUT is a rigorous mathematical transform. It doesn't just "look" like a certain style; it reassigns color data based on a fixed grid. This precision ensures that if you apply the same technical LUT to two different clips shot under identical conditions, the output will be mathematically identical, providing a level of reliability that creative filters cannot match.
Why Professional Filmmakers Rely on LUTs
The primary reason professionals prioritize what is a LUT and how to use it is consistency. On a national multi-camera production, maintaining a unified visual identity is a massive logistical challenge. LUTs allow the DIT (Digital Imaging Technician) to apply a uniform look across various camera bodies and lenses, ensuring the director and cinematographer are viewing a cohesive image. This consistency extends into post-production, where LUTs simplify the grading process for fast-turnaround broadcast projects by providing a corrected starting point.
- On-Set Monitoring: Providing clients and directors with a "finished" look prevents the confusion often caused by viewing flat Log footage.
- Exposure Accuracy: Using a technical LUT on a calibrated monitor helps cinematographers judge exposure and lighting ratios more effectively.
- Workflow Efficiency: Technical LUTs automate the normalization of Log footage, saving hours of manual labor in the initial stages of the edit.
By integrating these tools into the workflow, filmmakers can bridge the gap between the technical limitations of digital sensors and the creative requirements of professional storytelling.
The Science of Color: How LUTs Transform Professional Footage
The effectiveness of a Look-Up Table is rooted in the way digital sensors interpret light. When you record with professional video cameras, the sensor captures a raw or logarithmic signal that often exceeds the display capabilities of standard monitors. This creates a disconnect between the captured data and the Rec.709 color space used for broadcast and web delivery. Understanding what is a LUT and how to use it requires a grasp of how these tables remap high bit-depth information, such as 10-bit or 12-bit signals, into a manageable range without losing critical image detail.
Color gamuts play a decisive role here. A gamut defines the total range of colors a camera can record or a monitor can display. High-end cinema cameras from brands like Sony and ARRI capture wide gamuts that must be accurately mapped to smaller color spaces. Without the correct technical transform, your colors will appear shifted or inaccurate. The LUT acts as the mathematical bridge, ensuring that the high-fidelity data captured by your sensor translates correctly to the screen.
1D vs. 3D LUTs: Precision and Complexity
A 1D LUT is the simplest form of transformation. It uses a single-axis list of values to adjust brightness, contrast, and black levels. While useful for basic monitor calibration, it lacks the ability to adjust colors independently. 3D LUTs are the industry standard for digital cinema because they map color across a three-dimensional coordinate system, or cube. This allows for sophisticated control over the relationship between hue, saturation, and luminance. By using a 3D LUT, you can shift specific colors, like skin tones, without affecting the saturation of the background. This level of precision is why professional colorists prefer 3D structures for complex grade emulations.
Log Footage and Dynamic Range
Recording in a Log format is a strategic choice to maximize dynamic range. Log curves redistribute exposure values to capture more detail in the highlights and shadows than a linear curve would allow. This is why raw footage looks gray and lacking in contrast before a LUT is applied. The LUT's role is to "normalize" this footage, effectively reversing the logarithmic curve to restore natural-looking contrast.
Effective normalization does more than just make the image look "right"; it preserves the highlight and shadow detail you worked hard to capture on set. If you apply a LUT that isn't matched to your specific camera sensor and color gamut, you risk clipping highlights or crushing shadows. For those building complex multi-camera workflows, consulting our technical specialists can ensure your color pipeline remains robust from acquisition to final export. Mastering what is a LUT and how to use it ensures that your technical settings never compromise your creative vision.
Different Types of LUTs for Every Stage of Production
A common misconception in digital cinema is that Look-Up Tables are strictly post-production filters. In a professional environment, these tools are utilized across every stage of the workflow, from the initial lighting setup to the final broadcast delivery. Mastering what is a LUT and how to use it involves categorizing these tables based on their specific functional roles. By selecting the correct type of LUT for each phase, you ensure that the creative intent remains intact while maintaining technical standards for exposure and color accuracy.
Technical LUTs are the foundation of any Log-based workflow. Their sole purpose is to convert a wide-dynamic-range signal, such as S-Log3 or LogC, into a standard color space like Rec.709. This normalization process is non-negotiable for viewing footage on standard displays. Creative LUTs, by contrast, are used for stylistic storytelling. These often emulate specific film stocks or provide a unique color palette that defines the mood of a scene. While technical LUTs focus on accuracy, creative LUTs focus on the emotional impact of the visuals.
Two often overlooked categories are Calibration and Viewing LUTs. Calibration LUTs are loaded directly into high-end broadcast monitors to correct for any inherent color shifts in the display panel itself. This ensures that what you see on screen is a true representation of the data. Viewing LUTs are temporary looks used during the editing process; they provide a pleasing image for the editor and director to work with before the final color grade is applied.
Technical vs. Creative LUTs: Knowing the Difference
Order of operations is critical. You should always apply a technical LUT to normalize your Log footage before layering creative grades. A frequent mistake is applying a creative "look" directly to a flat Log image, which often leads to broken gradients and unnatural skin tones. On multi-camera sets using different brands, technical LUTs are essential for matching color gamuts, ensuring that a professional video camera from one manufacturer aligns with another in the same scene.
Monitoring LUTs for On-Set Accuracy
Monitoring LUTs allow the Director and DP to visualize the final product in real-time. By loading these into production monitors, the lighting department can judge skin tones and contrast ratios with confidence. This eliminates the guesswork of lighting for a flat image and ensures exposure is set correctly for the intended grade. If you need assistance configuring your on-set color pipeline, our technical team is available for expert consultation. Understanding what is a LUT and how to use it during production prevents costly errors that are difficult to fix in post-production.
How to Use LUTs Effectively in Your Workflow
Applying a Look-Up Table is a precise technical operation that requires a disciplined approach to image processing. To master what is a LUT and how to use it, you must view the LUT as one link in a larger color pipeline. The most common error in professional post-production is treating the LUT as the first and only step. Instead, your workflow should always begin with primary corrections. Adjusting exposure and white balance ensures you're feeding a clean, balanced signal into the mathematical transform, preventing the LUT from magnifying existing technical flaws.
Once you've established a neutral base, apply the technical conversion LUT to normalize the image. This restores the contrast and saturation levels intended by the camera manufacturer. It's often helpful to adjust the intensity or 'opacity' of the LUT. A 100% application might be too aggressive for certain scenes, so backing off to 70% or 80% can often result in a more natural, filmic look. Throughout this process, you must monitor your scopes. Waveforms and vectorscopes are your only objective tools for ensuring that your blacks aren't crushed and your highlights aren't clipping into illegal broadcast levels.
Applying LUTs in Post-Production Software
Your choice of software dictates how you manage your color nodes or layers. In DaVinci Resolve, the industry standard is to place your primary corrections on the first node and the technical LUT on a subsequent node. This prevents the LUT's fixed math from 'clipping' data that you could otherwise recover. Adobe Premiere Pro users should utilize the Lumetri Color panel, applying technical LUTs in the 'Basic Correction' tab and creative looks in the 'Creative' tab. Regardless of the platform, keep your LUT library organized by camera sensor and project type to maintain efficiency during high-pressure edits.
Best Practices for Exposure and Color Correction
A LUT is not a substitute for professional lighting equipment or correct on-set exposure. If a shot is two stops underexposed, applying a LUT will only highlight the digital noise in the shadows. We recommend the 'sandwich' method: perform corrective balancing before the LUT, and reserve stylistic grading for the nodes following the LUT. This protects the integrity of the sensor data captured by your professional video cameras. Always test your chosen LUTs across various lighting conditions during pre-production to ensure they perform consistently. This systematic approach is the only way to truly understand what is a LUT and how to use it at a professional level.
Integrating LUTs with Professional Cinema Hardware
Modern digital cinematography is defined by the synergy between sensor data and processing hardware. While post-production application is vital, understanding what is a LUT and how to use it at the hardware level is what separates professional acquisition from basic recording. High-end professional video cameras allow for custom LUT integration, enabling cinematographers to preview the final color intent in real-time while maintaining the full dynamic range of the Log data. This hardware-based approach is essential for ensuring that the creative vision established in pre-production is accurately represented on set.
Selecting the right cinema lenses is equally important to this workflow. Lenses dictate the optical characteristics, such as micro-contrast and flare, which the LUT then maps into the final color space. In live broadcast environments, hardware-based LUTs are indispensable for reducing latency. Applying these transforms within the camera or a dedicated converter ensures the program feed remains synchronized and color-accurate for immediate transmission. For complex studio environments, consulting with specialists on system integration is the most effective way to establish a reliable, low-latency color pipeline.
Loading Custom LUTs into High-End Cameras
Loading a Look-Up Table into your camera requires a specific technical sequence. For Sony systems like the FX6 or FX9, you must format your SD card and place the .cube files into the /PRIVATE/SONY/PRO/LUT/ folder before importing them via the camera's Paint/Look menu. ARRI and RED systems utilize similar proprietary import menus to host custom tables. You must decide between 'baked-in' LUTs, which permanently apply the look to the recorded media, and 'monitoring' LUTs, which only affect the display output. We recommend using monitoring LUTs for most professional projects to preserve the flexibility of the Log or RAW data for the final grade.
Professional Support and Equipment Calibration
A Look-Up Table is only as accurate as the display used to view it. Professional monitor calibration is a non-negotiable requirement for developing and applying LUTs with confidence. Without a calibrated reference point, you risk making critical exposure and color decisions based on inaccurate hardware. Regular equipment maintenance is also vital for maintaining color consistency across your fleet. We recommend visiting a professional service center for routine sensor cleaning and technical support to ensure your hardware continues to meet global broadcast standards. Mastering what is a LUT and how to use it requires both technical knowledge and a commitment to maintaining the precision of your production tools.
Elevating Your Production Workflow with Precision Color
Mastering the technical nuances of Look-Up Tables is a fundamental requirement for any modern cinematographer or broadcast professional. By understanding what is a LUT and how to use it, you transition from guesswork to a predictable, high-fidelity color pipeline. This expertise ensures that your Log footage is normalized correctly. It guarantees that your on-set monitoring is accurate. Most importantly, it ensures your creative intent remains intact from acquisition through to the final export.
United Broadcast & Media Solutions serves as a dependable industry pillar for the regional media community. We are an authorized distributor for global leaders like ARRI, Sony, and ZEISS. Our team brings over 25 years of industry expertise in the Middle East to every project. We provide specialized service center support and system integration expertise to keep your equipment performing at its peak. Whether you are matching colors across a multi-camera production or seeking the perfect monitoring setup, we possess the technical infrastructure to support your vision.
We look forward to helping you refine your technical workflow and achieve a consistent, cinematic result for your next production.
Frequently Asked Questions
What is the difference between a LUT and a filter?
A LUT is a mathematical coordinate transform that reassigns color values based on a fixed grid, whereas a filter is a broader stylistic overlay often used with variable opacity. While filters are purely creative, LUTs are technical tools used for precise color space conversion and consistency across professional production environments. LUTs provide a level of mathematical precision that creative filters cannot replicate.
Can I use a LUT on any type of footage, including smartphone video?
You can apply LUTs to any digital video, though the results depend on the source's color space and bit depth. While technical LUTs are designed for specific Log sensors, creative LUTs can be used on smartphone footage to achieve a specific look. Understanding what is a LUT and how to use it helps you select the right transform for your specific camera source to avoid image degradation.
Do LUTs permanently change my recorded video files?
LUTs are non-destructive when applied in post-production software, meaning they don't alter the original source files. However, if you choose to "bake-in" a LUT during recording in your camera settings, the look is permanently applied to the media. Most professionals prefer using monitoring LUTs on set to maintain the flexibility of the raw sensor data for the final grade.
What is the best way to preview a LUT before applying it?
The most accurate way to preview a LUT is on a calibrated production monitor using a clean video feed from your camera or workstation. In post-production, software like DaVinci Resolve allows you to hover over LUTs in the gallery for a real-time thumbnail preview. This ensures you see the color transformation accurately on a professional display before committing it to your processing pipeline.
Why does my footage look worse after applying a LUT?
Footage often looks poor after applying a LUT because of a mismatch between the footage color space and the LUT's intended input. If you apply an S-Log3 LUT to standard Rec.709 footage, the image will appear overly contrasty and distorted. Clipping and digital noise can also occur if your exposure and white balance weren't balanced before applying the transform.
How many LUTs should I use in a single project?
A standard professional workflow typically involves two LUTs: a technical conversion LUT and a creative look LUT. Using too many tables in a single node tree can lead to image degradation and artifacts. Mastering what is a LUT and how to use it involves learning to layer these tools sparingly to maintain the highest possible image quality throughout the project.
What is a 'PowerGrade' and how does it differ from a LUT?
A PowerGrade is a collection of grading nodes in DaVinci Resolve that includes various adjustments like curves, keys, and windows, whereas a LUT is a single mathematical transform. PowerGrades are fully adjustable, allowing you to tweak every individual parameter within the grade. LUTs are "black boxes" where you cannot see or change the internal math of the color shift.
Where can I find professional-grade technical LUTs for my camera?
Official technical LUTs should always be sourced directly from the camera manufacturer's website, such as Sony, ARRI, or RED. These files are specifically engineered to match the science of your camera's sensor and color gamut. Using third-party "conversion" LUTs can often lead to inaccuracies in skin tones and highlight roll-off that are difficult to correct in post-production.


