

Gimbal vs Steadicam: Compare Control and Range of Motion
The obvious choice for a moving shot may be the wrong one: use a gimbal for quick deployment and responsive, motorised control, and a Steadicam for rehearsed movement that needs natural pacing and smoother forward walking. Knowing when to use a gimbal vs a Steadicam comes down to the camera build, the route and the kind of motion the shot should convey.
Both systems can stabilise moving footage, but they do it differently, and that changes how they handle turns, stairs, tight spaces and extended moves. This guide compares setup, precision and range of motion across gimbals, Steadicams and shoulder rigs, then connects those practical differences to the emotional feel of the image. You’ll be able to match the stabilizer to the shot, whether you need nimble movement on the go or a controlled, continuous camera path.
Key Takeaways
- Match the stabilizer to the full camera build and planned move, not just the camera body.
- Choose motorised control for compact, quick-to-deploy setups; consider a mechanical system for rehearsed movement and longer walking shots.
- Account for setup and operating practice: each system handles movement differently, so rehearsal can help refine the shot.
- Compare how a gimbal, Steadicam and shoulder rig move through turns, tight spaces, stairs and low angles.
- Use the movement style to support the scene’s tone, from precise, controlled motion to a more natural, human-paced feel.
Gimbal vs Steadicam: Which Stabilizer Is Right for You?
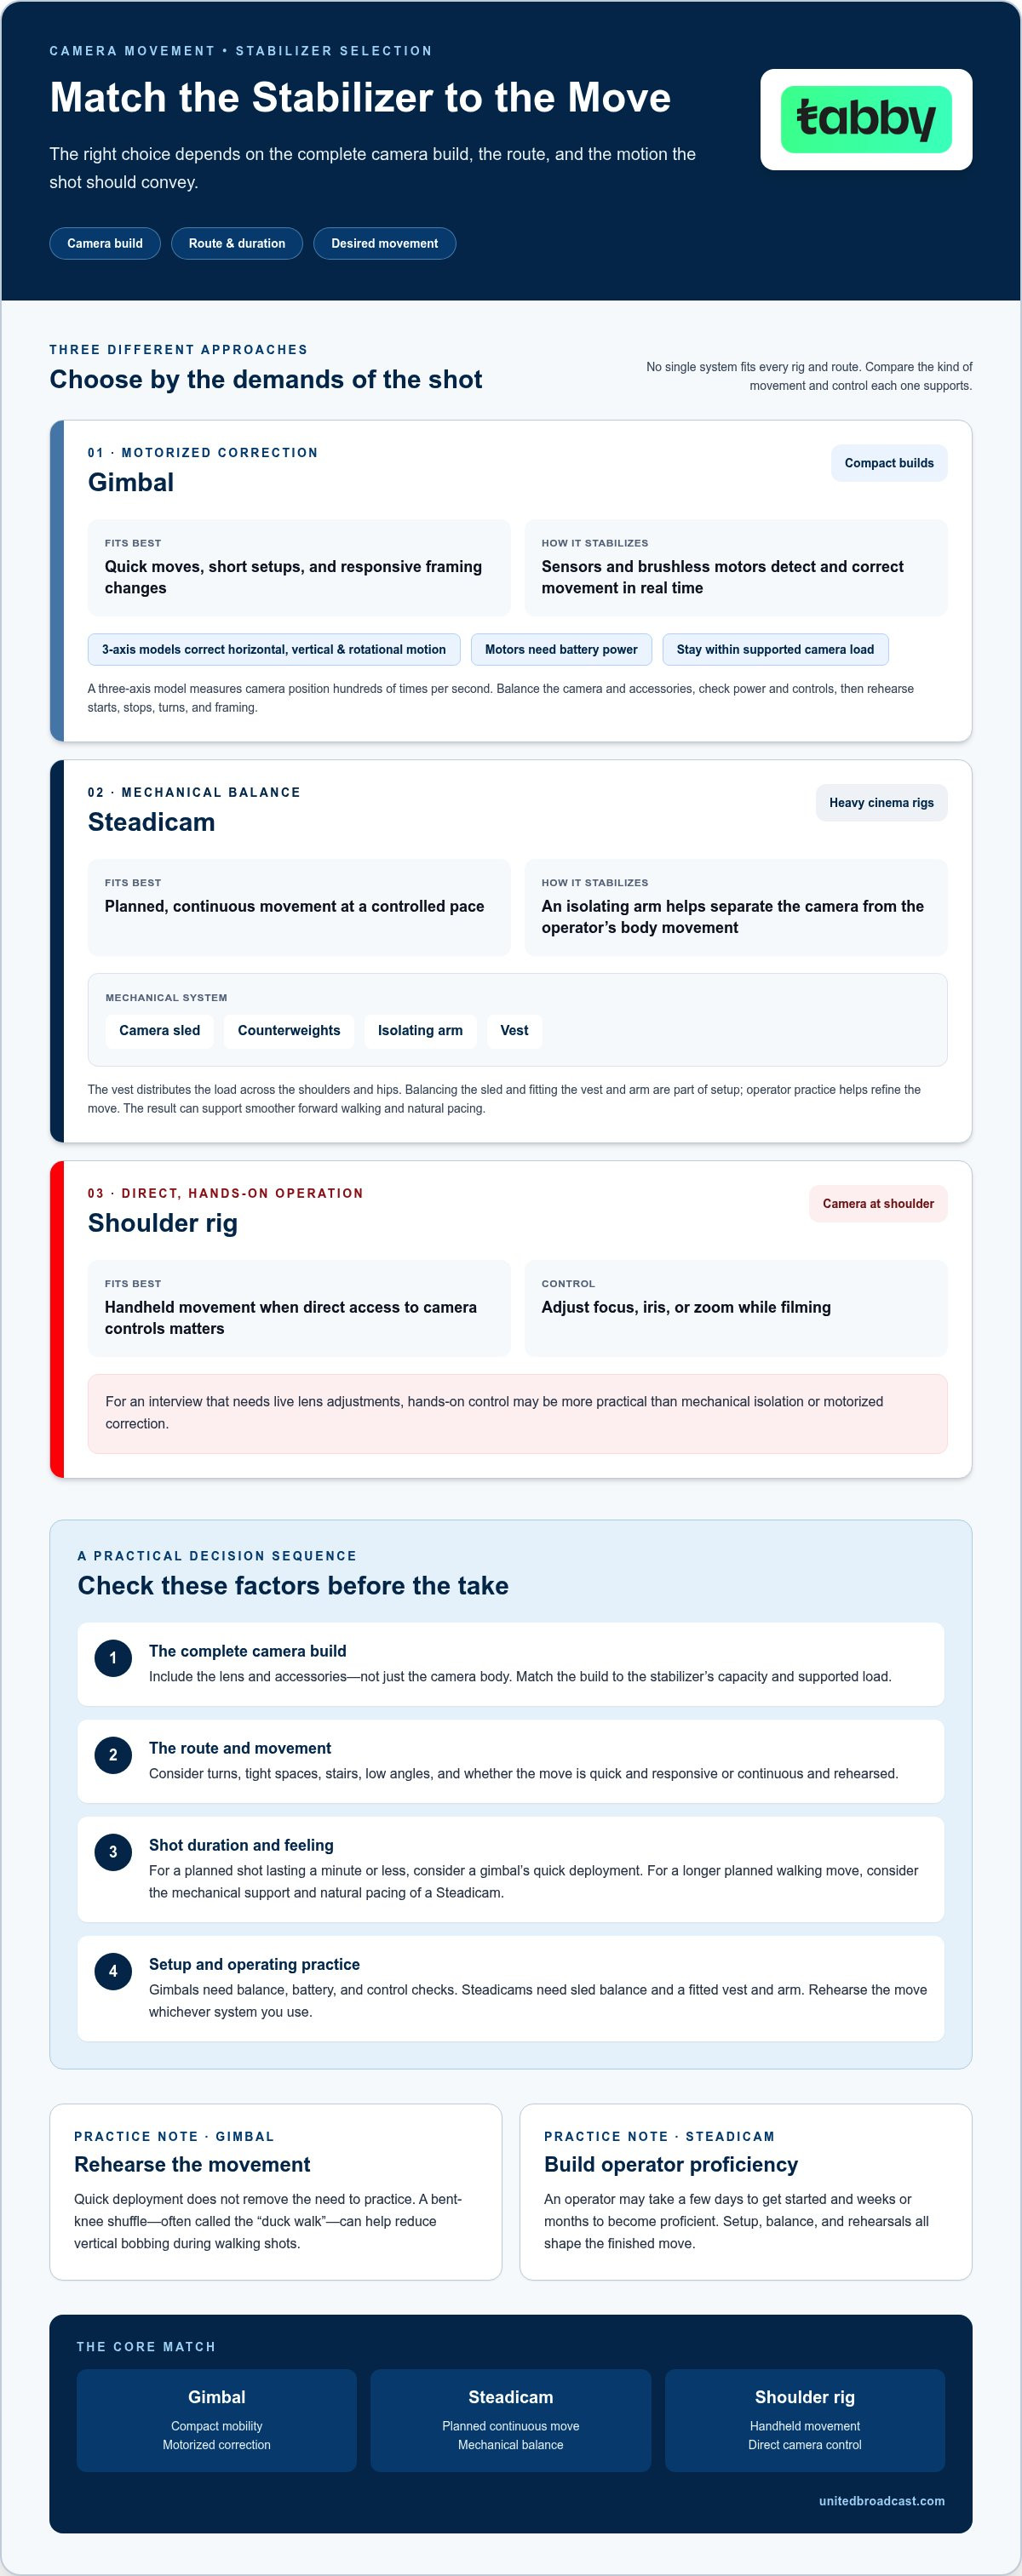
Choose based on camera weight, route, and shot duration. A gimbal offers motorized correction and quick deployment; a Steadicam supports deliberate, continuous movement.
A Steadicam often suits a heavy cinema camera moving steadily along a planned route. Its mechanical arm absorbs walking bob, while a gimbal suits compact setups and responsive camera control. When deciding when to use a gimbal vs a steadicam, compare the complete rig, route, and desired movement, not just the camera body. Rig costs depend on the system, accessories, camera configuration, and whether an operator is included.
Camera Weight and Shot Duration
Compare the stabilizer’s capacity with the complete camera build, including its lens and accessories. For a planned shot lasting a minute or less, consider a gimbal’s quick deployment. Let the camera’s weight and the required movement guide your choice.
Mechanical Steadicam Stabilization
A Steadicam combines a camera sled, counterweights, an isolating arm, and a vest. The operator balances the camera on the sled, while the vest distributes its load across the shoulders and hips. As the operator walks, the arm helps isolate the camera from body movement, reducing vertical bob. This mechanical system suits fluid forward movement along a planned route and at a controlled pace.
Motorized Gimbal Stabilization
A gimbal uses sensors and brushless motors to detect and correct camera movement in real time. A three-axis model stabilizes horizontal, vertical, and rotational motion, measuring camera position hundreds of times per second. This supports quick framing changes and mobile setups. Keep the camera build within the gimbal’s supported load, and remember that its motors need battery power.
A shoulder rig offers another option: direct, hands-on camera control rather than mechanical isolation or motorized correction. The operator can adjust focus, iris, or zoom while filming. For an interview that needs live lens adjustments, this setup may offer more practical control than either stabilizer.
| Option | Camera weight | Shot duration and movement | Control |
|---|---|---|---|
| Gimbal | Compact builds | Quick moves and short setups | Motorized correction |
| Steadicam | Heavy cinema rigs | Planned, continuous movement | Mechanical balance |
| Shoulder rig | Camera supported at shoulder | Handheld movement | Direct access to controls |
The practical answer to when to use a gimbal vs a steadicam is to match the rig to the camera build and intended path. Choose a gimbal for compact mobility, a Steadicam for balanced, continuous movement, or a shoulder rig when hands-on camera operation matters most.
Gimbal advantages, limitations and setup
A gimbal offers motorized stabilization, flexible shooting modes, and a compact setup. Its advantages depend on correct camera balance and planning for battery power, control settings, and transitions.
Setup Speed and Rig Transitions
A modular gimbal can save time when a production needs quick gear changes. For example, an operator may move between a handheld gimbal setup and a tripod configuration without rebuilding a mechanical vest-and-arm system. Plan the transition around camera balance, power, and the accessories attached to the rig.
A Steadicam setup requires balancing the sled and fitting the vest and arm to the operator. The system includes a camera sled, counterweights, an isolating arm, and a vest. Crew members can help with setup and rehearsals, while the operator controls the rig during the shot.
Setup and Portability Differences
A compact gimbal is easier to carry between locations than a complete Steadicam system with its vest, arm, and sled. Gimbal preparation includes battery and control checks; Steadicam preparation focuses on mechanical balance and fit. When moving frequently between locations, account for both setup tasks and the equipment that needs to travel.
Before filming, secure the camera and accessories, balance the gimbal, then power it on and test its movement. Subject tracking, timelapse modes, zoom, and camera switching can expand its functions. These options add setup decisions, so select only the modes the shot needs.
Gimbals suit fast-paced shoots and solo operation, particularly with smartphones or compact cameras. Their motors need batteries, and an electronics failure or depleted batteries stops motorized stabilization. A three-axis gimbal can also shut down its motors for protection if the camera load exceeds their maximum torque rating.
Learning the controls takes practice. A Steadicam operator may take a few days to get started and weeks or months to become proficient. A gimbal’s quick deployment doesn’t eliminate the need to rehearse: practice starts, stops, turns, and framing before recording. For walking shots, a bent-knee shuffle, often called the “duck walk,” can help reduce vertical bobbing.
Choose a gimbal when compact portability, fast rig changes or built-in shooting modes serve the scene. Choose a Steadicam when the planned move benefits from mechanical support and operator practice. To discuss how a camera setup affects stabilization choices, talk through your camera requirements.
Choosing equipment for the intended shot and emotional effect
Stabilization affects more than camera steadiness; it shapes how viewers experience movement. Choose equipment based on the scene’s purpose, the route, and the feeling each take should convey.
Production Scenarios
For a corporate walk-and-talk interview, a Steadicam can create natural pacing that feels human and connected. A gimbal’s highly controlled movement may feel more robotic in the same scene. For a fast-paced shoot with frequent framing changes, a gimbal offers mobile operation and responsive camera control.
Consider the environment as well as the subject. For instance, in interior property shoots and architectural walkthroughs—work often produced by visual teams like CURB360—a compact gimbal allows operators to easily navigate tight doorways and corridors. A planned move through a structured location can suit a Steadicam, especially with a large camera rig. A compact setup may be more practical for a solo operator moving between changing shot positions. Rehearse the route and framing before deciding which movement best supports the scene.
Cinematic Movement
For a deliberate cinematic move, plan the camera path, pace, and endpoint before choosing a stabilizer. A Steadicam supports rehearsed movement and can create a fluid, human-like glide through a scene. That character can suit an entrance, a corridor transition, or a continuous follow shot where natural pacing matters.
A gimbal can suit a shot that calls for precise, controlled motion or quick reframing. The choice isn’t simply between “cinematic” and “ordinary”: both systems can serve a cinematic scene. Instead, consider whether the movement should feel organically connected to an operator’s walk or deliberately controlled as the camera changes direction.
Use this sequence to match the rig to the story:
- Define the feeling. Decide whether the scene should feel intimate, measured, energetic, or controlled.
- Map the movement. Mark turns, entrances, stops, and changes in camera height along the route.
- Match the rig. Select a Steadicam for rehearsed, natural pacing, or a gimbal for quick movement and responsive control.
- Rehearse the take. Check how the camera tracks the subject and whether its movement supports the intended emotion.
For example, a character entering a quiet room may benefit from a Steadicam’s composed, continuous movement. A scene following activity through changing positions may call for a gimbal’s more immediate response. In either case, let shot design guide the operator’s pace, framing, and transitions rather than letting the stabilizer dictate them.
Before committing, compare the intended movement with the available rehearsal time, camera build, and route. A Steadicam can suit a structured, rehearsed sequence; a gimbal can suit mobile coverage that changes quickly. The strongest choice is the one whose movement reinforces the scene, not simply the one that produces the smoothest footage.
Gimbal motorized stabilization and precision
A gimbal’s precision comes from electronic correction, while a Steadicam depends on mechanical balance and operator control. Understanding the difference helps you plan camera movement, power needs, and setup checks for each shot.
A three-axis gimbal stabilizes horizontal, vertical, and rotational motion. Sensors detect camera movement, and brushless motors adjust the rig in real time. Camera position can be measured hundreds of times per second, helping the gimbal compensate for jerks, shakes, and bumps during fast movement. This correction supports a controlled frame, but it doesn’t choose the composition: the operator still directs the camera and its path.
For a moving shot, separate stabilization from framing. A gimbal can resist unwanted motion while the operator pans toward a subject or follows a changing route. Before recording, balance the camera build and calibrate the gimbal, then test starts, stops, turns, and changes of direction. Calibration and practice matter because poorly balanced equipment can affect motor performance and operator control.
Motorized stabilization also has power and load limits. A gimbal needs batteries, so plan for power throughout the shoot. If the batteries run out or the electronics fail, motorized stabilization becomes unusable. Each three-axis gimbal has a maximum motor torque rating; exceeding it can cause the motors to shut down for protection. A camera build that works in one configuration may become too demanding when accessories change the load.
A mechanical Steadicam works differently. Its sled, counterweights, vest, and isolating arm balance and support the camera without motorized correction. The arm helps separate operator movement from camera movement, while the vest distributes the load across the shoulders and hips. This system requires manual setup, balancing, and practice, but its stabilization doesn’t rely on batteries or functioning gimbal electronics.
That difference shapes the operator’s task. A gimbal uses electronic motors to correct movement; a Steadicam operator uses balance, arm control, and practiced movement to guide the camera. For a fast move with bumps, a gimbal’s three-axis correction can help maintain a stable frame. For a rehearsed walking shot, a mechanical Steadicam can support a more organic camera path.
Choose based on the required correction and production conditions. Check the complete camera load against the gimbal’s motor capacity, plan for battery power, and calibrate before shooting. With a Steadicam, balance the sled and rehearse the movement using its mechanical support system. Neither method removes the need for controlled camera operation; each gives the operator a different way to manage motion.
Comparing range of motion across gimbals, Steadicams and shoulder rigs
Range of motion depends on the route, camera position, and how the operator moves. A gimbal, Steadicam, and shoulder rig each allow different combinations of camera control and body movement.
While walking, a Steadicam’s mechanical arm helps absorb the operator’s vertical bob. On uneven ground, in tight hallways, or on stairs, an experienced operator can use instinct to maintain smooth footage. A gimbal can stabilize movement, but uneven surfaces may make consistent motion harder to achieve. Running adds stronger body movement, so test the route and pace with the intended rig.
The footage style differs, too. A gimbal’s motorized corrections can create controlled, steady framing as the camera changes direction. A Steadicam can retain a more natural sense of the operator’s movement, which may suit a continuous follow shot. A shoulder rig leaves more handheld movement visible, giving a scene a direct, grounded feel.
A gimbal supports responsive changes in direction and can be mounted on booms, jibs, cranes, and drones. This range makes it useful when a shot shifts between handheld operation and elevated or remote camera positions. Its motors stabilize three axes, but the operator still needs to steer the camera along the route and manage framing.
A Steadicam can move from standard operating height into low mode, skimming close to the floor. This expanded vertical range can create a floor-level tracking shot without switching to a separate camera path. The vest, arm, and sled support the camera as the operator moves, while the operator’s balance and practiced control shape turns and pace.
A shoulder rig offers less isolation from the operator’s body, but gives direct access to the camera. The operator can adjust focus, iris, or zoom while filming, which can be useful for a moving interview or observational shot. Shoulder operation suits movement that benefits from visible handheld character rather than a fully floating frame.
Compare the route before selecting a system. Mark stairs, narrow turns, floor-level framing, and any change from walking to a faster pace. Then match each segment to the required camera position and footage style. For example, a hallway-to-staircase move may favor a Steadicam operator’s practiced response, while a shot that rises onto a jib may call for a gimbal.
| Rig | Useful range | Movement character |
|---|---|---|
| Gimbal | Handheld, elevated, or remote mounting | Controlled motorized movement |
| Steadicam | Walking routes and low-mode floor shots | Fluid movement guided by operator skill |
| Shoulder rig | Handheld camera operation | Direct, visible operator movement |
Choose by the shot’s path: a Steadicam for practiced walking and low mode, a gimbal for flexible mounting, or a shoulder rig for hands-on control.
United Broadcast & Media Solutions (UBMS): Professional Video Cameras
United Broadcast & Media Solutions (UBMS) helps production teams select imaging equipment suited to their camera movement and shot requirements. Once you’ve clarified the movement you need, the next step is matching the camera build and lens to that operating style.
UBMS offers Professional Video Cameras, Digital Cinema Cameras, Cinema Lenses, and Professional Lighting Equipment. These products support decisions about camera configuration and image-making, whether your setup is designed for controlled movement or flexible operation. Consider the complete camera-and-lens combination when planning a stabilized shot, since its weight and balance affect how the rig handles.
For equipment suited to your production needs, contact United Broadcast & Media Solutions or visit unitedbroadcast.com.
Plan Your Next Camera Movement
Turn your rig choice into a practical camera test. Note the route, camera build, intended pace, and framing changes, then rehearse with the planned setup. Reviewing the footage and the operator’s movement can reveal adjustments to make before production.
That test also helps you match the stabilizer to the imaging package. United Broadcast & Media Solutions (UBMS) offers Professional Video Cameras, Digital Cinema Cameras, and Cinema Lenses for production requirements. If you’re deciding when to use a gimbal vs a Steadicam, assess the complete camera-and-lens setup on the actual route rather than relying on specifications alone.
With a clear shot plan and tested configuration, your crew can approach the next moving shot with purpose and confidence.
Frequently Asked Questions
So… Which One Should You Rent?
Choose based on the camera build, planned movement, and operator experience. A compact setup for mobile coverage may suit a gimbal, while a heavy cinema camera on a rehearsed walking route may suit a Steadicam. Before deciding, map the route and identify stops, turns, and changes in camera height. Then consider whether the shot needs quick reframing or a consistent, operator-guided path.
When Is a Gimbal the Best Tool?
A gimbal is a strong choice when the camera needs to move quickly between positions or change framing during a take. For example, a solo operator covering a compact subject through several nearby marks may benefit from its mobile setup. It can also suit shots that require a mounted camera on a jib, crane, boom, or drone, provided the camera build fits the system.
How does a gimbal differ from a Steadicam?
A gimbal uses electronic sensors and motors to correct camera movement, while a Steadicam relies on mechanical balance and an operator-guided arm. In practice, this affects both framing and operation: a gimbal can correct movement as the operator changes direction, while Steadicam movement depends more directly on balance and practiced handling. The systems also differ in power needs and setup tasks.
When should you use a gimbal instead of a Steadicam?
Use a gimbal when the shot benefits from quick deployment, compact equipment, or frequent changes in camera direction. For instance, a short sequence moving from a close subject to a wider view can benefit from its responsive framing. A gimbal also suits productions that need to transfer the camera between handheld operation and a compatible boom, jib, crane, or drone mount.
How do gimbals and Steadicams compare for long takes and heavy camera rigs?
A Steadicam can suit long, planned movement with a heavy cinema camera because its vest and arm support the operator’s load. For a gimbal, the complete camera build must stay within its motors’ torque rating, and battery power must last through the take. Account for lens and accessory changes too: added weight can affect balance and motor demands.
How difficult are gimbals and Steadicams to set up and operate?
A gimbal is generally quicker to deploy, but still needs careful balancing, calibration, and movement practice. A Steadicam requires more manual setup and operator training; getting started may take a few days, while proficiency can take weeks or months. With either system, rehearse the actual shot, including starts, stops, and turns, instead of judging readiness from a static setup.
What are the main drawbacks of gimbals, including motor vibration and horizon drift?
Motor vibration or horizon drift can disrupt a take, but don’t assume these effects occur with every gimbal. Check camera balance and calibration first, then confirm the camera build stays within the motors’ torque rating. A gimbal also depends on batteries and functioning electronics. If the motors shut down or power runs out, motorized stabilization stops working.
Are gimbals or Steadicams better for filming in tight spaces or outdoors?
Neither system is best for every location. In tight hallways, on stairs, or over uneven ground, an experienced Steadicam operator can use instinct to guide the camera along the route; a gimbal may be harder to manage without flat surfaces. For an outdoor move, assess the terrain, route width, and camera path before choosing a system and rehearsing the take.


