

De-squeezing Anamorphic Footage: Preview and Aspect Ratio
De-squeezing changes how anamorphic footage is displayed. It does not create image detail or increase the resolution recorded by the camera. This guide explains de-squeezing anamorphic footage as a horizontal scaling adjustment based on the lens’s squeeze factor, restoring the image’s proportions.
A squeezed preview can look narrow or distorted, so it is natural to wonder whether stretching it makes the image sharper. It does not: the adjustment changes the displayed width, while the captured pixels remain the same. The lens’s squeeze factor and the camera’s recording format determine the expanded aspect ratio.
This guide explains how anamorphic lenses compress a wider field of view, how squeeze factors affect framing, and why preview scaling is different from resolution. It also covers practical ways to de-squeeze footage on an iPhone or in editing software, including how to avoid applying the adjustment twice. You will learn to interpret the preview and choose the right display setting for your footage.
Key Takeaways
- De-squeezing corrects the image’s displayed proportions; it doesn’t add detail or increase the camera’s recorded resolution.
- Match the de-squeeze setting to the lens’s squeeze factor, which you can identify from its product information or barrel markings.
- Compare the camera’s capture format with the intended aspect ratio to understand how a squeeze factor will affect framing and cropping.
- On an iPhone or in editing software, apply the correct horizontal scaling for a natural-looking preview, and avoid de-squeezing footage twice.
- Explore camera and cinema lens options that suit your recording format and anamorphic workflow.
Choosing a squeeze factor when lens specifications are unknown
Start with the camera’s sensor format and intended frame, then compare them with the lens’s squeeze factor. The right pairing affects the expanded aspect ratio and how much cropping the workflow requires.
Identifying an Unknown Squeeze Factor
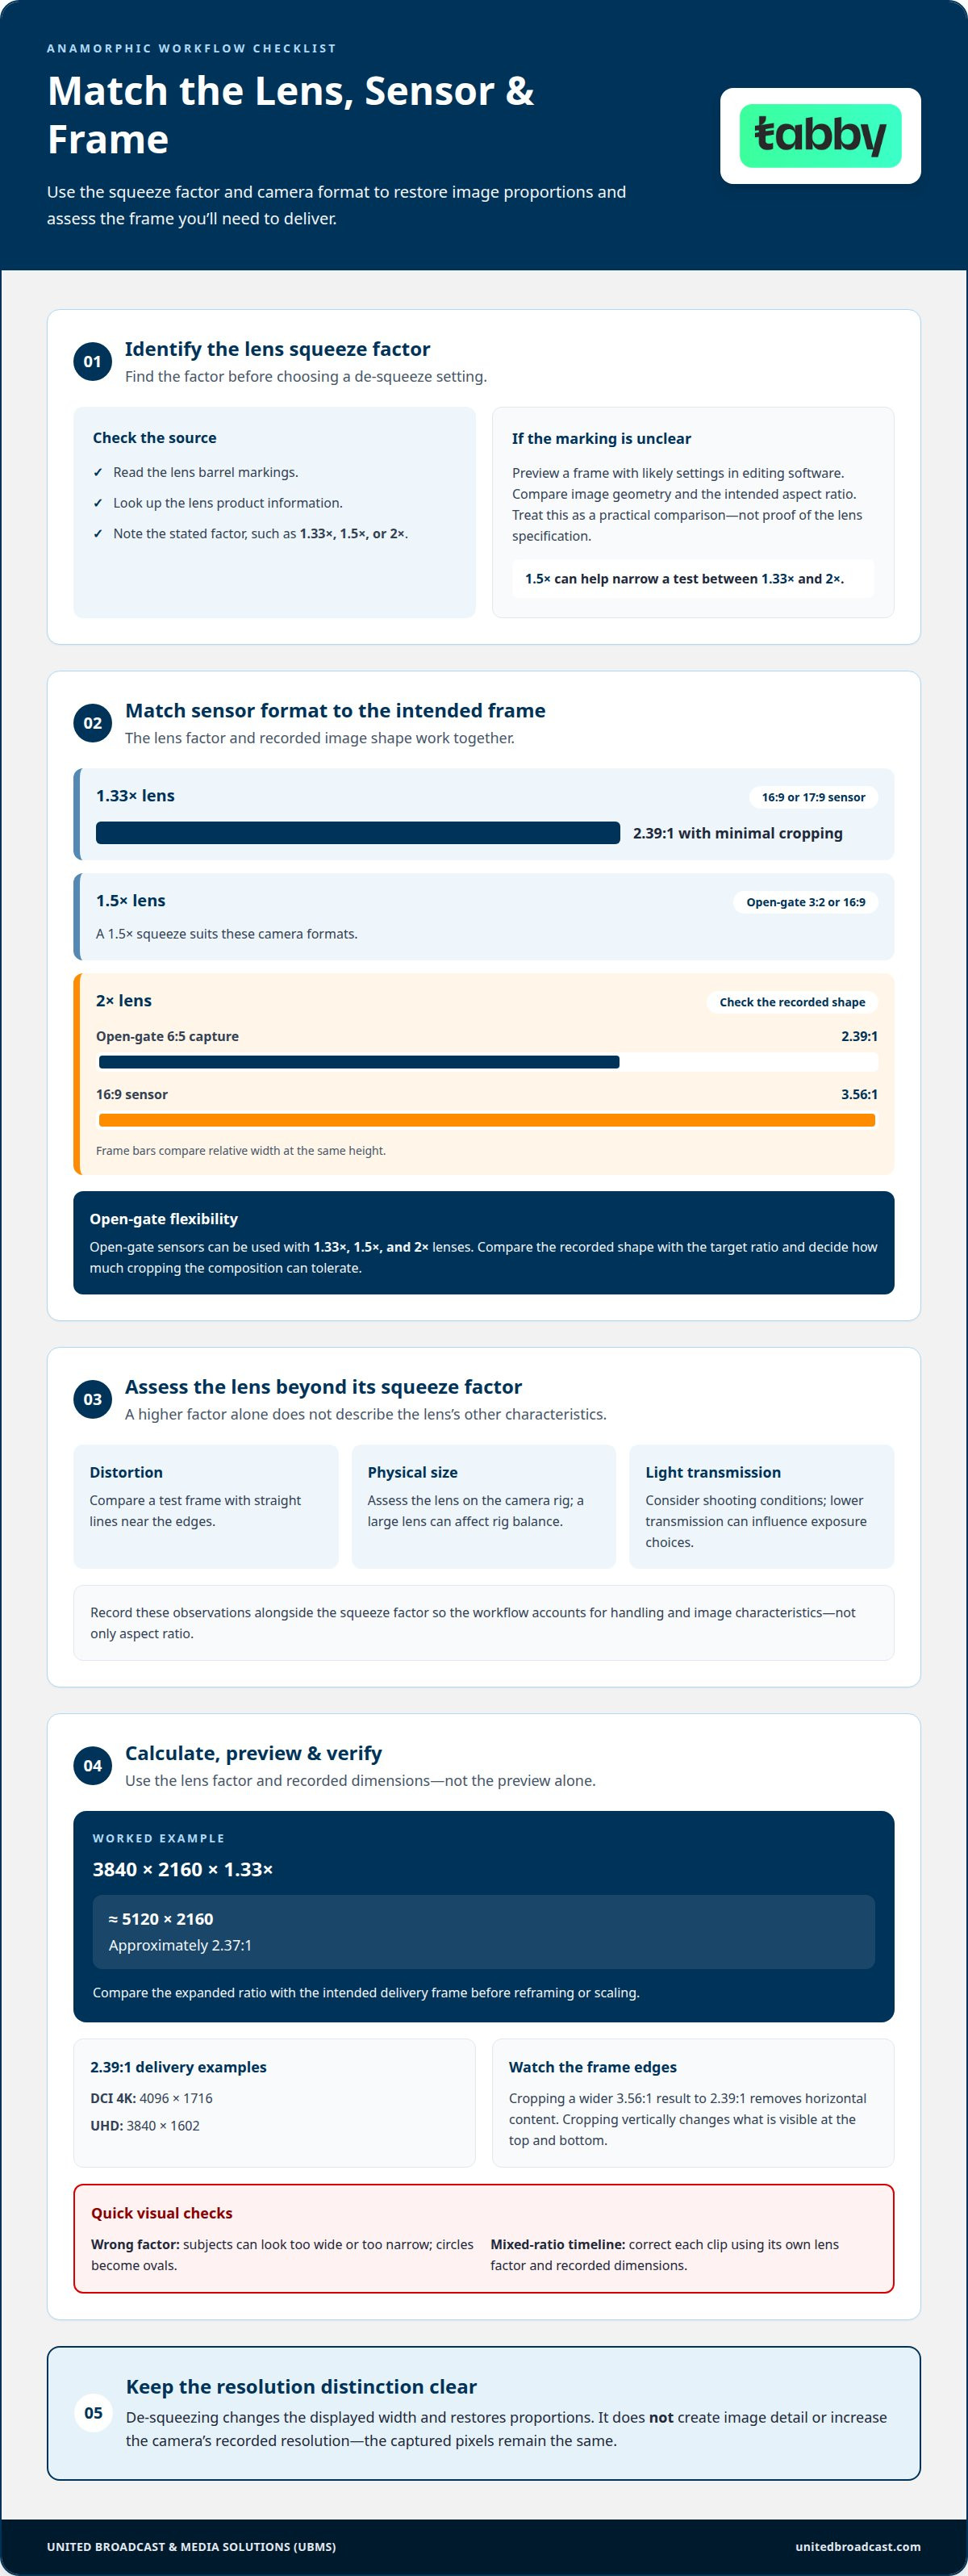
A squeeze factor describes how much an anamorphic lens compresses the image horizontally. To identify it, inspect the lens barrel markings or find the lens’s product page; both can state values such as 1.33x, 1.5x, or 2x. This matters because post-production needs the matching de-squeeze setting to restore the image’s proportions.
If the marking is difficult to read, preview a frame with the likely settings in editing software. Compare the image geometry and intended aspect ratio, but treat the preview as a practical comparison, not proof of the lens specification. A 1.5X option is a middle ground between 1.33X and 2X, so it can help narrow a test when those are the available alternatives.
Considering Distortion, Size, and Light Transmission
Squeeze factor is only one consideration when choosing a lens. Check distortion across the frame, the lens’s physical size on your camera rig, and its light transmission for your shooting conditions. These characteristics depend on the lens design, so a higher squeeze factor alone does not tell you how the lens renders edges, balances on a rig, or performs in low light.
Compare a test frame with straight lines near the edges, then assess the lens on the camera setup used in production. A large lens can affect rig balance, while lower light transmission can influence exposure choices. Record these observations alongside the squeeze factor so your workflow accounts for handling and image characteristics, not just aspect ratio.
Sensor format helps narrow the options. A 1.33X anamorphic lens paired with a 16:9 or 17:9 sensor can produce a 2.39:1 image with minimal cropping. A 1.5X squeeze suits open-gate 3:2 or 16:9 camera formats. Open-gate sensors can also be used with 1.33X, 1.5X, and 2X lenses, giving the recording format a central role in the decision.
For a 2X lens, open-gate 6:5 capture produces a 2.39:1 aspect ratio. By contrast, using 2X on a 16:9 sensor expands the image to 3.56:1, which may not match the intended delivery frame. Before selecting a factor, compare the sensor’s recorded shape with the target aspect ratio and decide how much cropping the composition can tolerate.
Digital sensors record the compressed image as pixels. De-squeezing changes its displayed width, not the captured detail. In a digital camera workflow, match the lens factor to the sensor format, then preview the result before settling on framing. This distinction helps prevent a visually wider image from being mistaken for increased sensor resolution.
Anamorphic squeeze factors and resulting aspect ratios
A squeeze factor determines the image’s expanded width and resulting aspect ratio. Compare the lens factor, camera recording format, and intended widescreen frame before adjusting the image or cropping.
Aspect Ratios from Different Squeeze Factors
An anamorphic aspect ratio is the image’s width compared with its height after de-squeezing. The factor matters because the same sensor format produces different frame shapes with different lenses. A 1.33X lens can convert 16:9 or 17:9 footage to 2.39:1 with minimal cropping. A 2X lens on a 16:9 sensor produces 3.56:1.
The squeeze factor affects the resulting frame shape, alongside the camera’s sensor format and any cropping. Open-gate 6:5 capture with a 2X lens produces 2.39:1. These examples show why the factor alone cannot determine the final frame: sensor shape and any crop also affect the delivered aspect ratio.
Calculating the De-Squeeze Aspect Ratio
Calculate the de-squeezed ratio by multiplying the recorded image width by the lens factor, then comparing that expanded width with the image height. For example, a 3840×2160 source shot with a 1.33x lens expands to approximately 5120×2160, or about 2.37:1. This helps identify whether the result is close to a 2.39:1 target.
Use the lens’s stated factor and the recorded frame dimensions, not the camera’s display preview alone. Then compare the expanded ratio with the delivery frame. Common targets include 4096×1716 for DCI 4K at 2.39:1 and 3840×1602 for UHD at 2.39:1.
If anamorphic footage is de-squeezed incorrectly, subjects appear too wide or too narrow, and circles become ovals. A factor mismatch also changes the resulting aspect ratio, potentially forcing an unwanted crop to fit a 2.39:1 timeline. Correct the clip’s de-squeeze setting before reframing or scaling it.
For mixed-ratio timelines, assess each clip using its own lens factor and recorded dimensions. A 1.33X clip and a 2X clip won’t share the same expanded shape, even when both come from 16:9 sensors. Apply the appropriate correction per clip, then decide whether the edit should preserve each frame or crop footage to a shared widescreen canvas.
Keep the image’s intended composition in view when matching a delivery ratio. For example, cropping a wider 3.56:1 result to 2.39:1 removes horizontal content, while cropping vertically changes the visible top and bottom. Preview the adjusted frame against the required output dimensions before final export.
Desqueezing footage on iPhone and in editing software
Anamorphic capture compresses horizontal proportions, so footage needs a matching display adjustment. In-camera de-squeezing corrects the monitoring preview; post-production de-squeezing changes how the recorded clip appears in the edit.
Project-Level De-Squeezing in DaVinci Resolve
Project-level de-squeezing sets up a DaVinci Resolve timeline to display footage at its expanded proportions. This can streamline a project when clips share the same squeeze factor and output format.
Set the project’s timeline dimensions for the intended de-squeezed frame, then check how the source clips appear in the viewer. A project-level setup alone will not suit footage with mixed lens factors: compare each clip’s image shape and apply the matching correction where needed. Review the result before exporting, especially if the timeline combines different capture formats.
Setting Timeline Resolution for Desqueezed Footage
Timeline resolution defines the dimensions of the edited and exported frame after horizontal expansion. Choose dimensions that match the intended delivery ratio rather than assuming the camera’s recorded resolution is already the final widescreen size.
For example, a 3840×2160 source shot with a 1.33x lens expands to approximately 5120×2160 before fitting a delivery frame. Common 2.39:1 targets include 4096×1716 for DCI 4K and 3840×1602 for UHD. Set the timeline to the required output dimensions, then inspect framing for cropping or scaling.
Applying De-Squeeze with Clip Attributes
Clip Attributes apply a de-squeeze setting to an individual clip in DaVinci Resolve. This is useful when a timeline includes footage from lenses with different factors or clips that need distinct display treatment.
Select a clip, open its attributes, and choose the matching anamorphic interpretation when available. Compare the viewer image with a known shape, such as a circular object, then adjust framing if the expanded image exceeds the timeline. Keep the correction consistent across matching shots, but do not automatically apply one factor to every clip.
In-Camera and Post-Production De-Squeezing
In-camera de-squeezing corrects the monitoring image during capture, while post-production de-squeezing adjusts the recorded footage in an editor. The distinction matters because an in-camera preview can look corrected even when the file remains squeezed.
On an iPhone, use an editing app with an anamorphic scaling control and match its setting to the lens factor. If the camera has already de-squeezed the recorded image, do not repeat the adjustment in post-production. Before exporting, review the image proportions and output dimensions. Applying the adjustment before export helps avoid scaling issues and quality degradation.
How anamorphic lenses compress a wider field of view
Anamorphic lenses use optical compression to fit a wider horizontal field of view into the recorded frame. A 2X lens captures twice as much image width as a spherical lens at the same focal length. The sensor still records a compressed image, so objects appear horizontally narrow until the image is stretched for viewing. This changes the recorded geometry, not the sensor’s physical dimensions.
Compression acts along the image’s longer dimension, while the vertical dimension remains comparatively unchanged. During capture, the lens maps a broad horizontal view into the camera’s frame. De-squeezing later expands the compressed width to restore proportions. This is why a preview may look unusually tall and narrow before correction, even though the lens captured a wider scene than a spherical lens with the same focal length.
Think of a 2X anamorphic lens and a spherical lens set to the same focal length. The anamorphic lens records twice the image width, with that width compressed into the frame. After the horizontal stretch, the wider view becomes visible. The comparison explains why the visual result isn’t simply a tighter or looser crop: anamorphic optics preserve a broader horizontal field within the capture.
A higher squeeze factor captures a wider horizontal field of view with the same focal length. That added width changes how the camera records the scene, including the relationships between foreground and background across the frame. The factor also informs the later display adjustment. For example, a 2X lens requires more horizontal expansion than a 1.33X lens, so applying the wrong setting changes apparent proportions.
Compression also shapes recognizable visual characteristics. Stronger anamorphic squeeze is associated with oval bokeh and horizontal lens flares, effects that come from the lens’s optical design. These can affect how out-of-focus highlights and bright sources appear, but the factor alone does not describe every rendering trait. Inspect a test shot with the intended camera and lens to assess their combined field of view, flare, and focus rendering.
For a practical comparison, record the same scene from the same camera position with anamorphic and spherical lenses at the same focal length. Compare the horizontal coverage, then view the anamorphic take with its intended stretch. This shows what the lens adds to the captured field, rather than suggesting that post-production created extra scene detail. The comparison helps you evaluate anamorphic framing before committing to a production workflow.
How anamorphic lenses squeeze footage horizontally
Anamorphic lenses compress the image horizontally during capture, then de-squeezing stretches it for normal viewing. The lens’s optical design changes how scene width maps onto the camera sensor. A 2X lens, for example, captures twice as much image width as a spherical lens at the same focal length. De-squeezing reverses the displayed compression, but it doesn’t create additional recorded image detail.
The lens performs the squeeze optically, before the sensor records the image. Imagine a wide doorway in the scene: its width is compressed into the recorded frame, while its height remains comparatively unchanged. The result can look narrow or vertically elongated. Applying the correct horizontal stretch restores proportions, so the doorway and other familiar shapes look natural in the preview.
The factor describes the amount of horizontal compression. With a 1.33x lens, the display adjustment expands the recorded width by 1.33x; a 2X lens calls for twice the recorded width. A 3840×2160 recording made with a 1.33x lens expands to approximately 5120×2160 before any delivery crop. The sensor’s pixel count hasn’t grown, even though the displayed image is wider.
This distinction matters when comparing anamorphic and spherical lenses. At the same focal length, the 2X anamorphic lens records twice the image width, while the spherical lens records a narrower horizontal view. De-squeezing reveals the anamorphic frame’s captured width. It doesn’t widen a spherical recording or recover scene information that fell outside its field of view.
Compression also influences the appearance of highlights and defocused areas. Stronger anamorphic squeeze is associated with oval bokeh and horizontal lens flares. These visual traits come from the optics, not from the editing stretch alone. For example, stretching a squeezed frame restores its proportions, but it does not independently add an anamorphic flare to footage captured with a spherical lens.
To understand the image path, follow one horizontal line in the scene. The anamorphic lens compresses that line optically; the camera sensor records the compressed projection; post-production expands its displayed width. A 1.33x lens and a 2X lens therefore need different de-squeeze settings. Matching the setting to the lens is essential: a mismatch makes faces, circles, and other familiar shapes appear too wide or too narrow.
The practical takeaway is that anamorphic compression happens in the lens, while de-squeezing is a display correction. Keep the captured frame distinct from its intended visual proportions when assessing a camera setup. A wider-looking image after stretching reflects the lens’s horizontally compressed capture, not increased resolution. The squeeze factor determines the correction needed for viewing.
United Broadcast & Media Solutions (UBMS): Professional Video Cameras
United Broadcast & Media Solutions (UBMS) offers Professional Video Cameras, Digital Cinema Cameras, and Cinema Lenses for production workflows where sensor format and lens squeeze factor affect framing. When planning an anamorphic setup, consider how the camera’s capture format pairs with the lens and intended aspect ratio before selecting equipment.
Comparing camera and lens options can help align the recorded image with your monitoring and post-production workflow. UBMS also offers Professional Lighting Equipment for production setups. Contact United Broadcast & Media Solutions to discuss your camera and lens requirements.
Plan Your Next Anamorphic Setup
Use your next camera test to turn these settings into a repeatable production workflow. Record a short scene with the intended lens, review the preview and captured file separately, then assess framing on the delivery timeline. This practical check helps your team make informed choices before a full shoot.
For teams seeking de-squeezing anamorphic footage explained in the context of equipment choices, United Broadcast & Media Solutions (UBMS) offers Professional Video Cameras, Digital Cinema Cameras, and Cinema Lenses. Considering the camera and lens together can help align your setup with the sensor format and the visual result you want.
Take the next step with a clear workflow and a setup shaped around your production goals.
Frequently Asked Questions
Does de-squeezing the preview increase video resolution?
No. De-squeezing changes the image’s displayed width, not the amount of detail captured by the camera sensor. To understand de-squeezing anamorphic footage in a camera test, compare the preview with the recorded file. A preview may show a wider frame after scaling, but that visual change adds no recorded information. Expanding a compressed face makes its proportions look natural, but does not restore detail absent from the original capture.
How can I verify if my saved video file is still squeezed?
Open the saved file in an editor and inspect familiar shapes, such as a circular sign or a face. If circles look oval and people appear unusually narrow, the image may still be squeezed. Also review the camera’s recording settings and the clip’s display interpretation in your software. Pixel dimensions alone may not answer the question because they do not show whether horizontal correction has already been applied.
What Does Desqueezing Mean in Anamorphic Workflows?
De-squeezing means adjusting an anamorphic recording’s displayed proportions for viewing and editing. To understand it in a practical workflow, compare the camera preview with the saved file after import. A camera can show a corrected monitoring image while recording squeezed footage. This comparison helps determine whether the correction belongs in monitoring, post-production, or neither, and prevents an unnecessary adjustment.
What is Squeeze Factor?
A squeeze factor describes how strongly an anamorphic lens compresses the image horizontally. The factor guides the matching display correction and affects the resulting frame shape. For instance, a 2X lens captures twice as much image width as a spherical lens at the same focal length, while its recorded image remains compressed. Use the factor marked on the lens to identify the appropriate correction in your camera or editor.
What does de-squeezing anamorphic footage mean?
It means expanding the recorded image horizontally so objects appear proportionate during viewing or editing. The adjustment can happen in a camera’s monitoring display or in post-production. For example, applying the lens’s correction to a squeezed clip makes a round object appear round in the viewer. It changes how the image is displayed; it does not recreate scene content outside the camera’s original capture.
What are common anamorphic squeeze factors such as 1.33x, 1.5x, and 2x?
These values describe different amounts of horizontal compression and produce different aspect ratios on the same sensor format. A 1.33X lens can convert 16:9 or 17:9 footage to 2.39:1 with minimal cropping. A lens’s squeeze factor affects the resulting frame shape, so check its compatibility with the sensor format. A 2X lens on 16:9 produces 3.56:1, while open-gate 6:5 capture with 2X produces 2.39:1.
How can you tell which de-squeeze factor footage needs?
Find the lens factor on its barrel markings or product information, then match that value to the footage’s correction setting. When reviewing an existing clip, test the likely setting against recognizable geometry, such as circular objects and faces. Check whether the camera already de-squeezed the recorded image. Using lens identification, clip review, and camera settings together helps prevent an incorrect or duplicate correction.
Does de-squeezing anamorphic footage reduce resolution or image quality?
De-squeezing does not add captured detail or inherently reduce the source’s recorded resolution. It scales the image horizontally for correct display. However, scaling and export choices affect how the final image is rendered, so choose output dimensions suited to the intended frame and avoid unnecessary resizing. Review the exported file at its intended playback size. Footage already de-squeezed in-camera should not receive the correction again in post-production.


